
Introduction to RV Air Conditioner Installation
Installing an RV air conditioner can seem daunting, but with clear RV air conditioner installation instructions, you can achieve optimal cooling performance for your travels.When it comes to enjoying the great outdoors in your RV, having a reliable air conditioning system is essential for maintaining comfort during hot weather. Installing an RV air conditioner may seem daunting, but with the right instructions and precautions, it can be a straightforward process. In this guide, we will explore the importance of proper installation and provide an overview of the different types of RV air conditioners available on the market.
Importance of Proper Installation
Proper installation of your RV air conditioner is crucial for several reasons:
-
Optimal Performance: A correctly installed air conditioner ensures efficient cooling and energy use. This not only enhances comfort but also prolongs the lifespan of the unit.
-
Prevention of Damage: Incorrect installation can lead to water leaks, electrical issues, and even potential damage to the RV’s structure. Ensuring that the unit is secured and sealed properly helps avoid these problems.
-
Safety: Proper installation minimizes safety risks associated with electrical connections and potential fire hazards. Following the manufacturer’s guidelines and adhering to safety protocols is vital.
-
Warranty Protection: Many manufacturers require professional installation to maintain warranty validity. Ensuring your installation meets these requirements can save you money on repairs down the line.
-
Resale Value: A well-installed air conditioning system can enhance the resale value of your RV. Potential buyers often look for features that have been installed correctly and maintained well.
Overview of Different RV Air Conditioner Types
There are several types of RV air conditioners to choose from, each with its own features and benefits. Understanding these options can help you select the best unit for your needs:
-
Roof-Mounted Air Conditioners: These are the most common type of RV air conditioner. Installed directly on the roof, they are compact and efficient. Roof-mounted units typically require a ceiling vent for air distribution and come in various BTU ratings to suit different RV sizes.
-
Portable Air Conditioners: These units can be moved around within the RV and do not require permanent installation. Portable air conditioners are great for users who need flexibility but may require additional venting for optimal performance.
-
Ducted Air Conditioning Systems: Ideal for larger RVs, ducted systems distribute cool air through vents located throughout the vehicle. While more complex to install, they provide consistent temperature control and are quieter than roof-mounted units.
-
Hybrid Air Conditioners: These units combine features of both ducted and non-ducted systems, allowing for versatile cooling options. They can be installed on the roof or mounted inside the RV, offering flexibility based on user preference.

Preparing for Installation
Before diving into the installation of your RV air conditioner, proper preparation is essential. This includes gathering the necessary tools and materials and ensuring safety precautions are in place. Following these guidelines will facilitate a smoother installation process and ensure that your new air conditioning unit operates efficiently.
Tools and Materials Needed
Having the right tools and materials on hand is crucial for a successful RV air conditioner installation. Here’s a comprehensive list of what you’ll need:
-
Basic Hand Tools:
- Screwdrivers: Both Phillips and flathead screwdrivers will be required for securing the unit and connecting electrical components.
- Wrenches: A set of adjustable wrenches will help tighten bolts and nuts during installation.
- Pliers: Needle-nose pliers are useful for reaching tight spaces and handling small components.
-
Power Tools:
- Drill: A cordless drill will make it easier to secure the air conditioning unit and drill any necessary holes.
- Saw: Depending on your RV model, you may need a jigsaw or reciprocating saw to cut openings for venting.
-
Safety Equipment:
- Safety Glasses: Protect your eyes from debris while drilling or cutting.
- Gloves: Heavy-duty work gloves will help prevent injuries when handling tools and materials.
-
Materials:
- Sealant: Use a high-quality silicone or rubber sealant to ensure a watertight fit around the unit.
- Insulation Tape: This will help in sealing any gaps and improving energy efficiency.
- Electrical Wire: Ensure you have the correct gauge of wire to connect your air conditioner to the RV’s power supply.
- Mounting Brackets: These are often included with the unit but ensure you have the proper brackets for secure installation.
-
Installation Manual: Always refer to the manufacturer’s installation manual specific to your air conditioner model for detailed instructions and specifications.

Safety Precautions
Safety should always be a top priority during any installation project. Here are essential safety precautions to follow:
-
Read the Manufacturer’s Instructions: Before starting the installation, carefully read the air conditioner’s installation manual to understand specific safety guidelines and requirements.
-
Turn Off Power: Always disconnect the power supply to the RV before beginning any installation work. This reduces the risk of electrical shock.
-
Work in a Well-Ventilated Area: Ensure adequate ventilation when working inside the RV, especially if using adhesives or sealants that may emit fumes.
-
Use a Ladder Safely: If your installation involves working on the roof of the RV, use a sturdy ladder and ensure it is positioned securely. Never overreach or lean too far to one side while on the ladder.
-
Get Help When Needed: Some installation tasks may require extra hands, especially when lifting or securing heavy units. Don’t hesitate to ask a friend or family member for assistance.
-
Check for Electrical Hazards: Inspect the RV’s wiring and connections for any damage before starting the installation. If you’re unsure about any electrical work, consult a professional.
By preparing adequately with the right tools, materials, and safety precautions, you can ensure a smooth installation process for your RV air conditioner, leading to a comfortable and enjoyable RV experience.
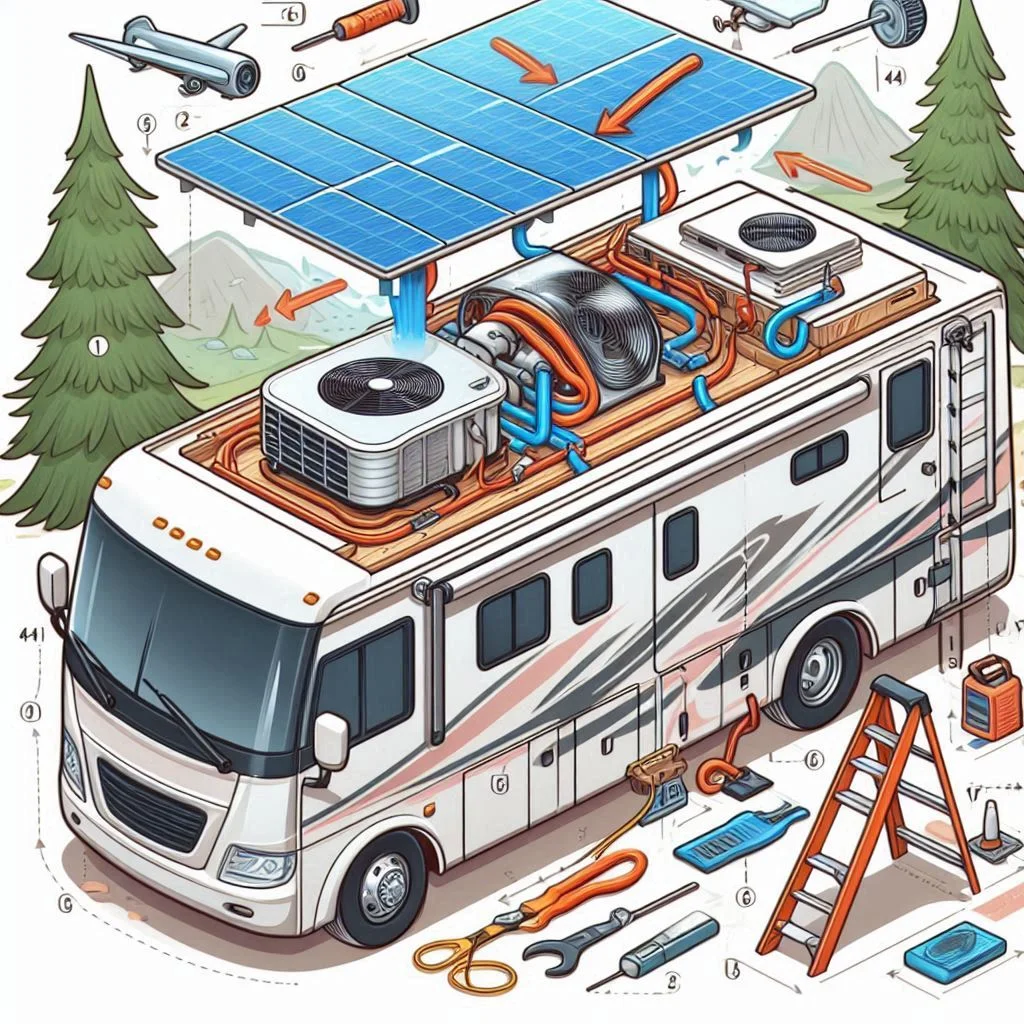
Step-by-Step RV Air Conditioner Installation Instructions
Installing a new RV air conditioner can greatly enhance your travel experience, providing much-needed relief during hot weather. This section will guide you through the entire process, from removing the old air conditioner to installing the new one.
Removing the Old Air Conditioner
Before installing your new air conditioner, it’s essential to safely remove the existing unit. Follow these steps:
-
Prepare the Area: Clear the space around the air conditioner inside your RV and on the roof. Remove any furniture or items obstructing access.
-
Disconnect the Power Supply: Ensure that the RV’s power supply is completely turned off. Disconnect any electrical connections linked to the old air conditioner.
-
Remove the Inside Vent Cover: Use a screwdriver to detach the vent cover from the interior. This allows access to the mounting screws of the air conditioner.
-
Unscrew the Unit: Locate and remove the screws that secure the air conditioner to the roof. Be cautious when handling the screws, as they may be corroded or difficult to remove.
-
Carefully Lift the Unit: With assistance, gently lift the old air conditioner off the roof. Make sure to watch for any wiring that may still be connected, and carefully detach it as needed.
-
Inspect the Area: Once the old unit is removed, check the roof for any damage or leaks. Make repairs as necessary to ensure a clean installation surface for the new air conditioner.

Installing the New Air Conditioner
Now that the old unit is removed, you can proceed with installing the new RV air conditioner. Follow these detailed steps:
-
Position the New Air Conditioner: With assistance, carefully position the new air conditioner over the opening in the roof. Ensure that it aligns properly with the vent inside the RV.
-
Secure the Unit:
- Securing the Unit: Use the provided mounting brackets and screws to secure the new air conditioner to the roof. Follow the manufacturer’s guidelines for the correct torque specifications to avoid over-tightening, which could damage the unit.
-
Connect Electrical Wiring:
- Connecting Electrical Wiring: Carefully connect the electrical wires according to the installation manual. This may involve matching color-coded wires and ensuring a secure connection. Use wire nuts or electrical tape to insulate the connections to prevent any short circuits.
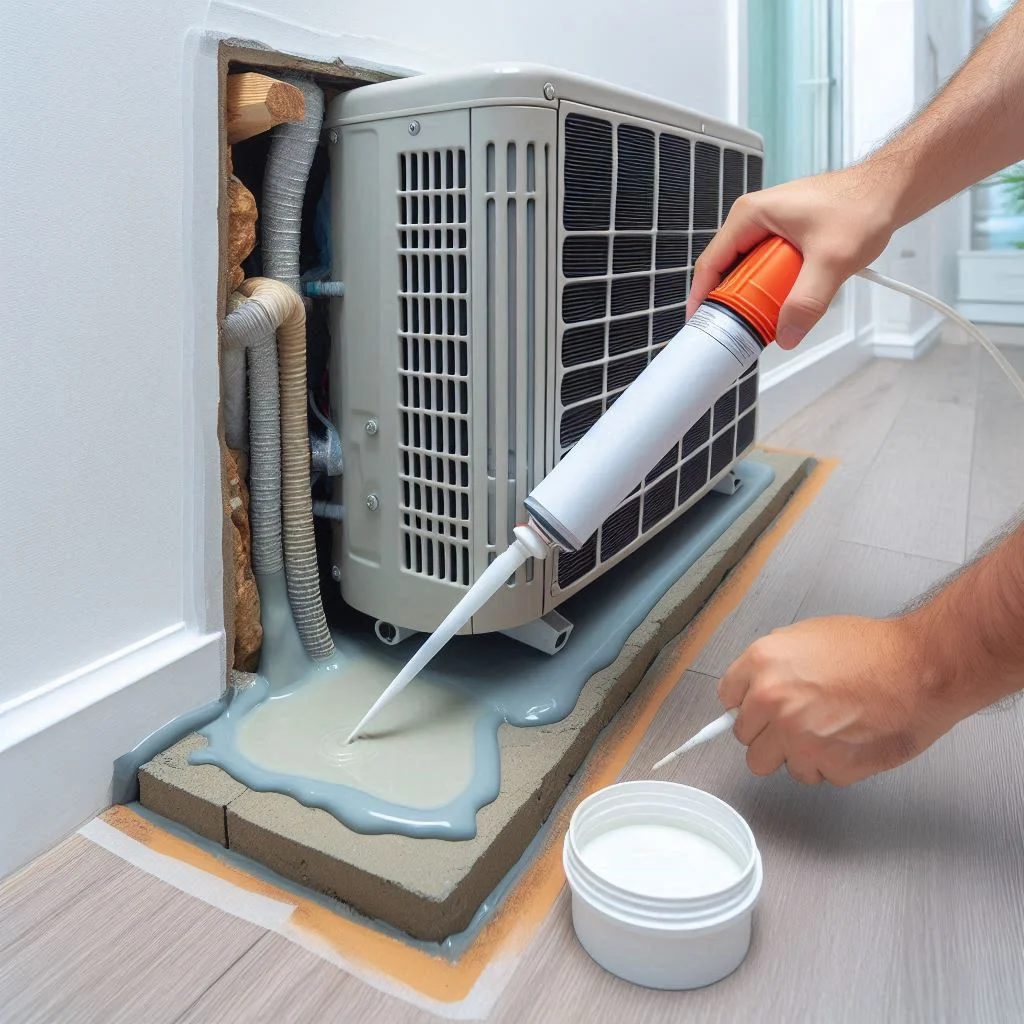
- Sealing and Insulating the Unit: Apply a high-quality sealant around the edges of the air conditioner on the roof to prevent water leaks. Additionally, use insulation tape on any exposed wiring to protect against moisture and heat loss. Ensure that the vent inside is properly sealed to maintain efficient airflow.
Seal and Insulate the Unit:
-
Install the Interior Vent Cover: Once everything is securely in place and sealed, reattach the interior vent cover. This will help direct the cool air throughout the RV.
-
Turn on the Power Supply: After double-checking all connections and seals, restore power to the RV and test the new air conditioner to ensure it’s functioning properly.
-
Perform a Final Inspection: Check for any signs of leaks or unusual noises. Monitor the performance to confirm that the installation was successful.
By following these detailed steps, you can ensure a smooth installation process for your new RV air conditioner, enhancing your comfort and enjoyment on the road.
Post-Installation Checks
After successfully installing your RV air conditioner, it’s crucial to perform post-installation checks to ensure that everything is functioning correctly. This includes testing the system and addressing any potential issues that may arise. Following these steps will help maximize your air conditioner’s performance and reliability.
Testing the System
Once your RV air conditioner is installed, you should conduct several tests to ensure it operates efficiently:
-
Turn on the Power Supply: Restore power to your RV by switching on the main circuit.
-
Set the Thermostat: Adjust the thermostat to the desired temperature setting. This will initiate the cooling process.
-
Listen for Operation Sounds: As the unit starts, listen for any unusual noises. A properly functioning air conditioner should operate quietly, with minimal sound from the compressor and fan.
-
Check Airflow: Place your hand near the air vents inside the RV to check the airflow. You should feel a strong and consistent flow of cool air. If the airflow is weak, there may be a blockage or an issue with the installation.
-
Monitor Temperature: Allow the air conditioner to run for at least 15-30 minutes. After this period, check the temperature of the air blowing from the vents. It should be significantly cooler than the ambient temperature inside the RV.
-
Inspect for Leaks: Look around the installation area for any signs of water leaks. If you notice moisture or water pooling around the unit, this could indicate a sealing issue that needs to be addressed.

Troubleshooting Common Issues
If you encounter problems during the testing phase, here are some common issues and troubleshooting tips:
-
Insufficient Cooling:
- Possible Causes: Blocked filters, low refrigerant levels, or improper installation.
- Solution: Check and clean or replace the air filter. If the issue persists, you may need to have a professional inspect the refrigerant levels and installation.
-
Strange Noises:
- Possible Causes: Loose components, debris in the fan, or a malfunctioning motor.
- Solution: Inspect the unit for loose screws or components. Ensure that the fan is clear of debris. If the noise continues, consult a technician for a thorough inspection.
-
Water Leaks:
- Possible Causes: Improper sealing, clogged drain lines, or incorrect installation.
- Solution: Inspect the seals around the unit for gaps and reapply sealant if necessary. Check for blockages in the drain line and clear any debris.
-
Electrical Issues:
- Possible Causes: Faulty wiring or circuit breaker tripping.
- Solution: Ensure all electrical connections are secure and properly insulated. If the circuit breaker continues to trip, consult a qualified electrician to inspect the system.
-
Remote Control Malfunctions:
- Possible Causes: Dead batteries, interference, or improper pairing.
- Solution: Replace the batteries in the remote and ensure it is within range. Check the user manual for pairing instructions if the issue persists.
By conducting thorough testing and being prepared to troubleshoot common issues, you can ensure that your RV air conditioner operates efficiently and reliably, enhancing your overall comfort on the road.
Maintenance Tips for RV Air Conditioners
To ensure optimal performance and longevity of your RV air conditioner, regular maintenance and seasonal preparation are essential. Following these maintenance tips will help you avoid costly repairs and keep your air conditioning system running efficiently throughout your travels.
Regular Cleaning and Maintenance
Regular cleaning and maintenance of your RV air conditioner can significantly enhance its performance. Here are key tasks to incorporate into your maintenance routine:
-
Clean or Replace Air Filters:
- Frequency: Check your air filters monthly, especially during peak usage periods.
- Action: Clean reusable filters with mild soap and water, and let them dry completely before reinstallation. If the filters are disposable, replace them with new ones as needed. Clogged filters restrict airflow and can reduce cooling efficiency.
-
Inspect the Coils:
- Frequency: Inspect the evaporator and condenser coils at least twice a year.
- Action: Gently clean the coils with a soft brush or vacuum to remove dirt and debris that can hinder heat exchange. A clean coil enhances the unit’s efficiency and prolongs its lifespan.
-
Check the Drain Line:
- Frequency: Inspect the drain line before and after heavy usage.
- Action: Ensure the drain line is clear of obstructions to prevent water buildup. If necessary, flush the line with vinegar or a specialized cleaner to remove any blockages.
-
Inspect Seals and Insulation:
- Frequency: Check seals and insulation every season.
- Action: Examine the seals around the air conditioner for any gaps or wear. Replace worn seals to prevent leaks and improve energy efficiency. Insulation should also be in good condition to maintain temperature control.
-
Conduct Electrical Inspections:
- Frequency: Perform electrical checks during your biannual maintenance routine.
- Action: Inspect wiring and connections for any signs of wear or damage. Ensure all connections are tight and free of corrosion to prevent electrical issues.

Seasonal Preparation
Preparing your RV air conditioner for seasonal changes is crucial for optimal performance and longevity. Here are essential seasonal maintenance tips:
-
Pre-Season Check-Up:
- Timing: Before the start of the travel season, usually in spring.
- Action: Conduct a thorough inspection of your RV air conditioner, following the cleaning and maintenance tips outlined above. This includes checking filters, coils, drain lines, and electrical connections.
-
Post-Season Shutdown:
- Timing: At the end of the travel season, typically in fall.
- Action: Clean the unit thoroughly, removing any dirt or debris. Ensure that the air conditioner is completely dry to prevent mold growth during storage. Cover the unit with a breathable cover to protect it from dust and weather elements.
-
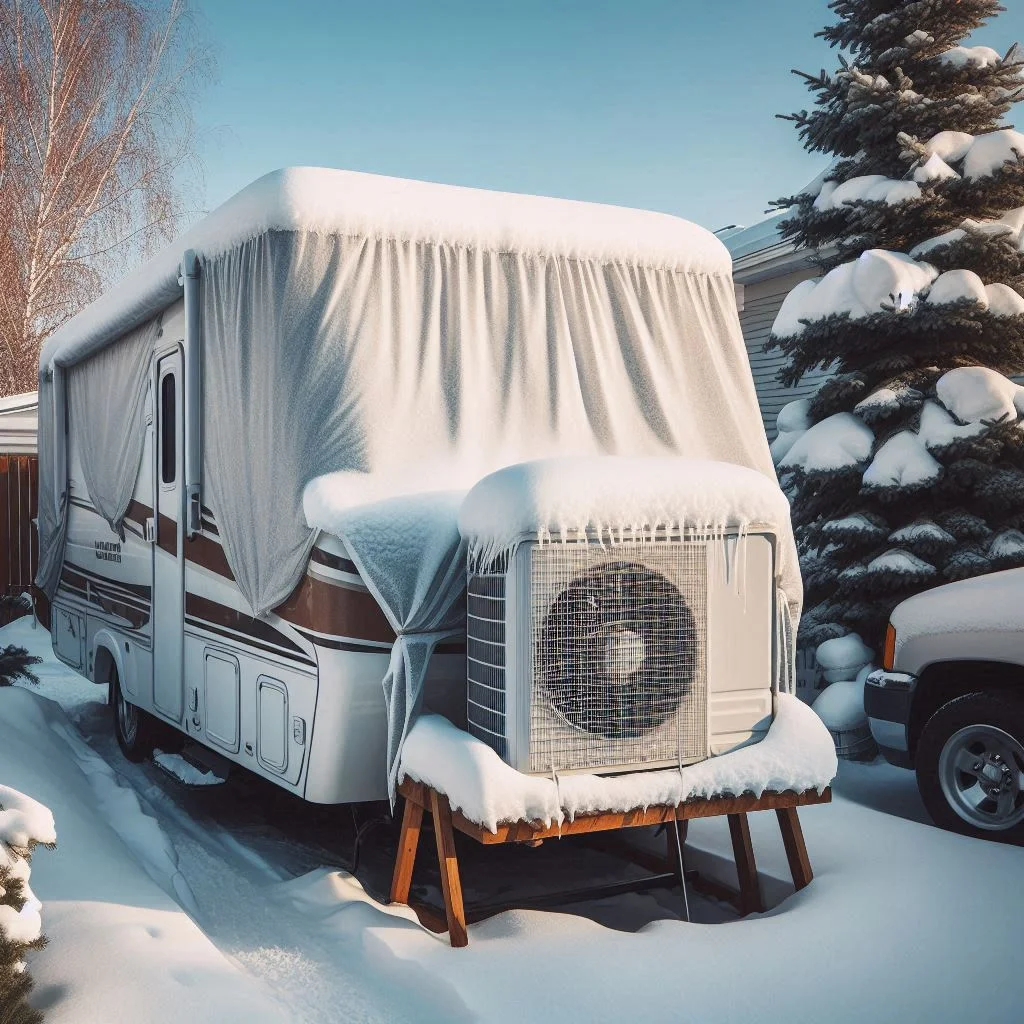
Preparing for Extreme Weather:
- Timing: Before entering any extreme weather conditions, whether hot or cold.
- Action: If expecting extreme heat, ensure your air conditioner is in optimal condition and ready for increased usage. Conversely, during colder months, ensure your unit is winterized to prevent damage from freezing temperatures.
-
Monitor Performance:
- Action: Throughout the season, pay attention to how well your air conditioner is performing. If you notice any changes in cooling efficiency or unusual sounds, address these issues promptly to avoid larger problems.
By following these maintenance tips and preparing your RV air conditioner for seasonal changes, you can ensure that it operates efficiently and reliably throughout your travels. Regular maintenance will not only extend the lifespan of your unit but also enhance your overall comfort on the road.
Frequently Asked Questions (FAQs)
This section addresses common questions regarding RV air conditioners, providing detailed information to assist RV owners in making informed decisions about their cooling systems.
How do I know which RV air conditioner is right for my vehicle?
Choosing the right RV air conditioner involves several considerations to ensure optimal performance and comfort:
-
RV Size and Insulation:
- Measure the size of your RV in square feet. The larger the RV, the more cooling power you’ll need. Typically, RV air conditioners are rated by BTU (British Thermal Units). A general guideline is 20 BTU per square foot of space. Additionally, well-insulated RVs may require less cooling power.
-
Type of Air Conditioner:
- Decide between a rooftop or portable air conditioner. Rooftop units are more common in RVs due to their efficient cooling and space-saving design. Portable units can be used in specific areas but may be less efficient overall.
-
Energy Efficiency Ratings:
- Look for models with a high Energy Efficiency Ratio (EER). Higher EER ratings indicate better efficiency, which translates to lower energy consumption and operating costs.
-
Noise Levels:
- Consider the noise level of the unit. Some models operate quietly, while others can be quite loud. Reading customer reviews can help you find a quieter option.
-
Budget and Brand Reputation:
- Set a budget and research reputable brands known for quality and reliability. Investing in a trusted brand can ensure long-lasting performance and better warranty support.

Can I install an RV air conditioner myself, or should I hire a professional?
The decision to install an RV air conditioner yourself or hire a professional depends on several factors:
-
DIY Installation:
- Pros: Installing the unit yourself can save money on labor costs. Many RV owners find satisfaction in completing the task themselves.
- Cons: The installation process can be complex, requiring knowledge of electrical systems, proper sealing, and alignment. If not done correctly, it can lead to issues like air leaks or electrical malfunctions.
-
Hiring a Professional:
- Pros: Hiring a professional ensures that the installation is done correctly and safely, minimizing the risk of future problems. Professionals are experienced in troubleshooting and can provide warranties on their work.
- Cons: The main drawback is the cost of labor, which can add to the overall expense of purchasing a new air conditioner.
Consider your skill level, comfort with DIY projects, and the complexity of the installation before making a decision. If in doubt, hiring a professional is usually the safer option.
What are the common problems encountered during installation?
During the installation of an RV air conditioner, several common problems may arise:
-
Improper Sealing:
- Failure to properly seal around the unit can lead to air leaks, reducing cooling efficiency. Ensure all seals are applied correctly to prevent this issue.
-
Electrical Issues:
- Incorrect wiring can cause electrical shorts or malfunctioning systems. Always double-check electrical connections and refer to the manufacturer’s instructions for wiring guidelines.
-
Alignment Problems:
- If the unit is not aligned correctly on the roof, it may vibrate or make noise during operation. Ensure proper alignment during installation.
-
Inadequate Insulation:
- Not properly insulating the unit can lead to temperature fluctuations and decreased efficiency. Ensure insulation is applied according to specifications.
-
Drainage Problems:
- If the drain line is not properly installed, it can cause water to pool around the unit, leading to mold and damage. Check that the drain line is positioned correctly.

How can I improve the efficiency of my RV air conditioner?
Improving the efficiency of your RV air conditioner can lead to lower energy consumption and enhanced comfort. Here are several tips:
-
Regular Maintenance:
- Follow a regular maintenance schedule, including cleaning or replacing filters, inspecting coils, and checking insulation and seals. A well-maintained unit operates more efficiently.
-
Use Reflective Covers:
- When parked, use reflective covers or shades on windows to minimize heat gain from sunlight. This helps the air conditioner cool the interior more effectively.
-
Optimize Ventilation:
- Ensure good ventilation within your RV. Use roof vents or open windows when conditions allow to facilitate air circulation and reduce reliance on the air conditioner.
-
Limit Heat Sources:
- Reduce the use of heat-generating appliances, such as ovens and stovetops, during the hottest parts of the day. Opt for outdoor cooking when possible to keep the interior cooler.
-
Set a Reasonable Temperature:
- Avoid setting the thermostat to extremely low temperatures. Setting it to a comfortable level (e.g., 75°F) can reduce the workload on the air conditioner.

Conclusion
In conclusion, understanding RV air conditioner installation and maintenance is essential for any RV owner looking to enhance their comfort during travels. From selecting the right unit based on your vehicle’s size and insulation to following detailed installation instructions and conducting regular maintenance, each step plays a crucial role in ensuring optimal performance. Additionally, being aware of common installation challenges and knowing how to troubleshoot them can save you time and money in the long run. By implementing efficiency tips, you can not only improve your air conditioner’s performance but also extend its lifespan while enjoying your adventures on the road. With the right knowledge and care, you can create a comfortable and enjoyable environment in your RV, making every journey a memorable one.