
Introduction to DIY Air Conditioner Window Seal
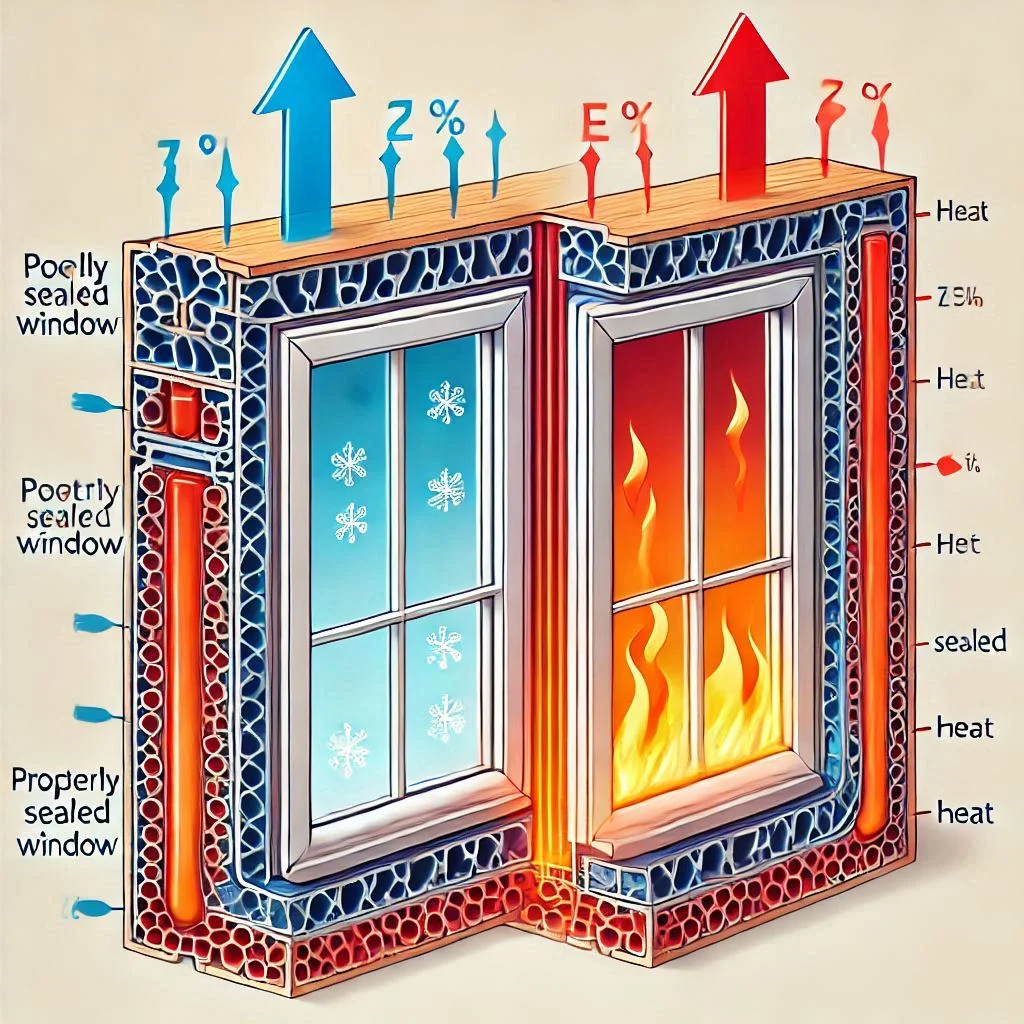
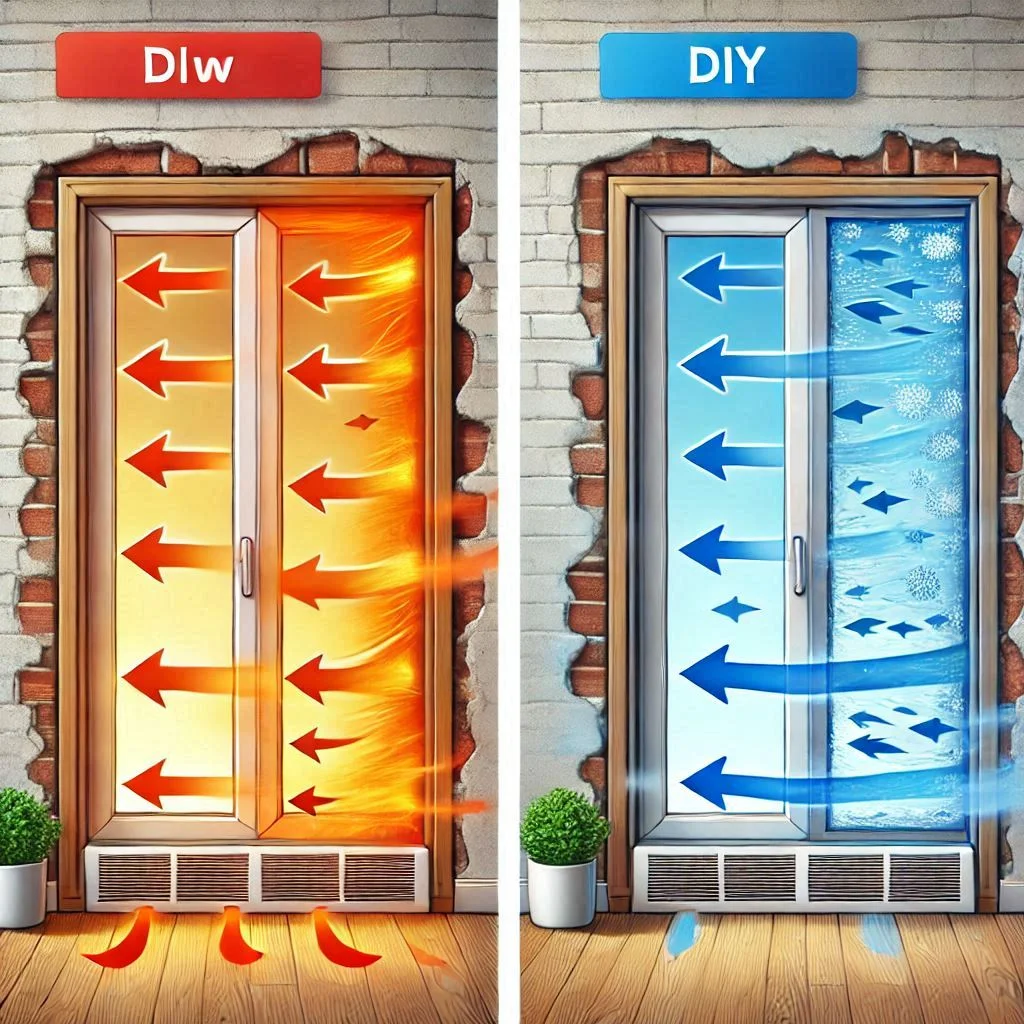
A portable air conditioner can be a lifesaver during the sweltering summer months, but without proper insulation, much of its cooling efficiency can be lost. One of the most common challenges users face is dealing with air leaks around the venting system, which can allow warm air to seep into your home and reduce the unit’s performance.
This is where a DIY air conditioner window seal becomes a game-changer. It not only ensures a secure fit for your portable air conditioner’s vent pipe but also prevents heat exchange, leading to a more comfortable indoor environment and lower energy bills. Additionally, creating your own window seal is a budget-friendly solution that doesn’t require specialized skills or expensive materials.
Why Is a Window Seal Essential for Portable Air Conditioners?
- Improves Cooling Efficiency: A properly sealed window ensures that warm outdoor air doesn’t mix with the cooled indoor air, allowing your air conditioner to work at its full capacity.
- Energy Savings: By preventing air leaks, your unit won’t have to work overtime, resulting in significant energy savings.
- Reduces Noise and Dust: Sealing the window can also minimize noise from the outside and prevent dust or debris from entering your home.
- Eco-Friendly: A more efficient air conditioner consumes less electricity, contributing to a greener environment.
Cost-Effective Benefits of a DIY Window Seal
- Affordability: Most materials, such as polystyrene boards, duct tape, and insulation foil, are inexpensive and readily available.
- Custom Fit: Unlike pre-made seals, a DIY solution can be tailored to your specific window size and shape.
- Reusable Design: With careful handling, a DIY window seal can last for multiple seasons.
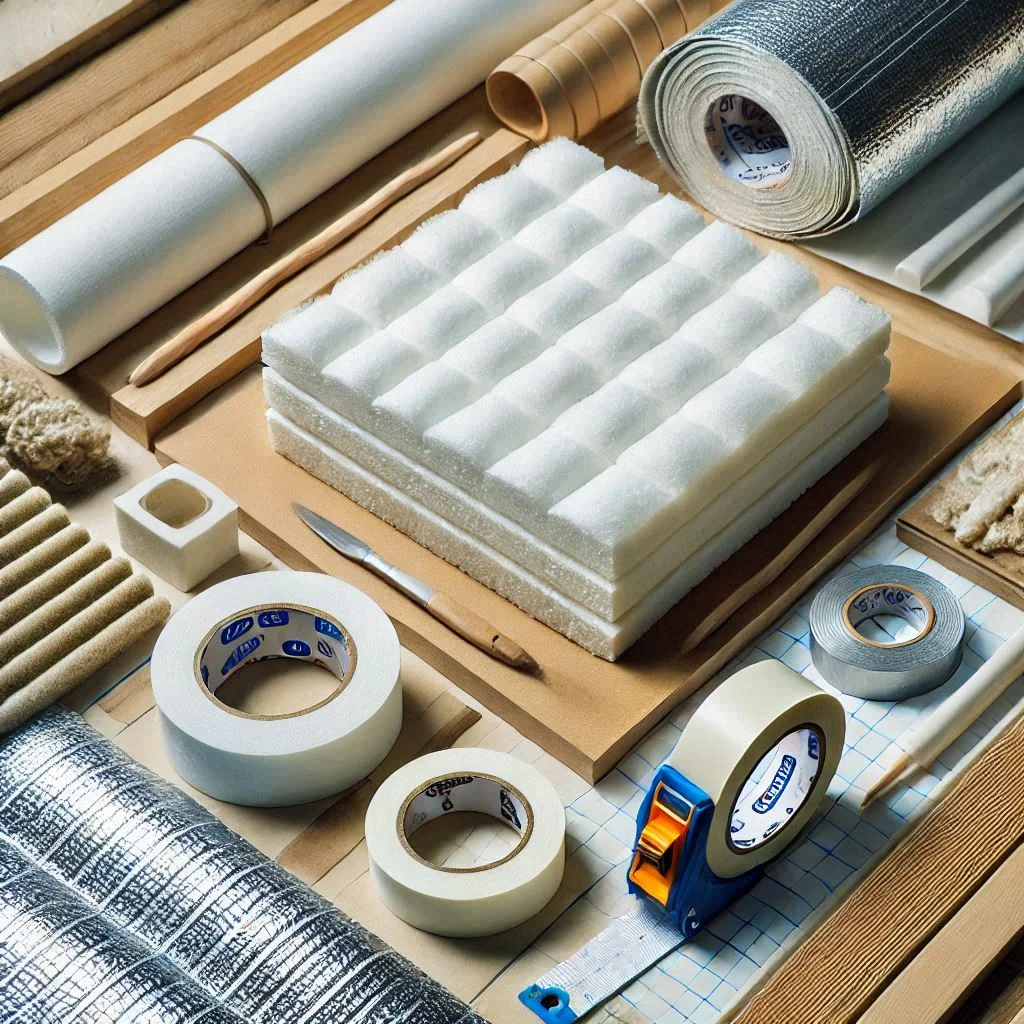
Materials and Tools Needed for the DIY Window Seal
Creating a DIY air conditioner window seal requires only a few simple materials and tools. Each item plays a critical role in ensuring your window seal is durable, effective, and energy-efficient. Below, we’ll detail the materials and tools needed, their importance, and tips for choosing the best options.
List of Materials
- Polystyrene Board
- Purpose: Acts as the primary insulating material to block hot air and maintain a secure seal.
- Tips: Choose a board with adequate thickness (1-2 inches) for better insulation and durability.
- Benefits: Lightweight, affordable, and easy to cut to fit any window size.
- Duct Tape
- Purpose: Used for reinforcing the edges of the polystyrene board and sealing gaps.
- Tips: Opt for heavy-duty, weather-resistant duct tape to ensure longevity.
- Insulation Foil
- Purpose: Enhances thermal insulation by reflecting heat away from the window.
- Tips: Aluminum foil-backed insulation works best for this application.
- Vent Pipe Flange or Gasket (Optional)
- Purpose: Helps securely attach the vent pipe to the window seal for an airtight connection.
- Tips: Ensure it matches the diameter of your portable air conditioner’s vent pipe.
- Adhesive or Velcro Strips
- Purpose: Secures the seal panel to the window frame for easy installation and removal.
- Tips: Use removable adhesive to avoid damage to the window frame.

List of Tools
- Measuring Tape
- Purpose: Ensures accurate measurements of your window dimensions and vent pipe diameter.
- Tips: Use a metal tape measure for better precision.
- Cutter or Utility Knife
- Purpose: Cuts the polystyrene board and insulation foil to size.
- Tips: Ensure the blade is sharp for clean and precise cuts.
- Marker or Pencil
- Purpose: Marks the cutting lines on the board and foil.
- Tips: Use a bold marker for better visibility on polystyrene surfaces.
- Straight Edge or Ruler
- Purpose: Guides straight cuts on the polystyrene board and foil.
- Tips: A metal straight edge works best for a clean cut.
- Drill (Optional)
- Purpose: Creates a clean hole for the vent pipe if a cutter isn’t suitable.
- Tips: Use a hole saw attachment matching the pipe diameter.

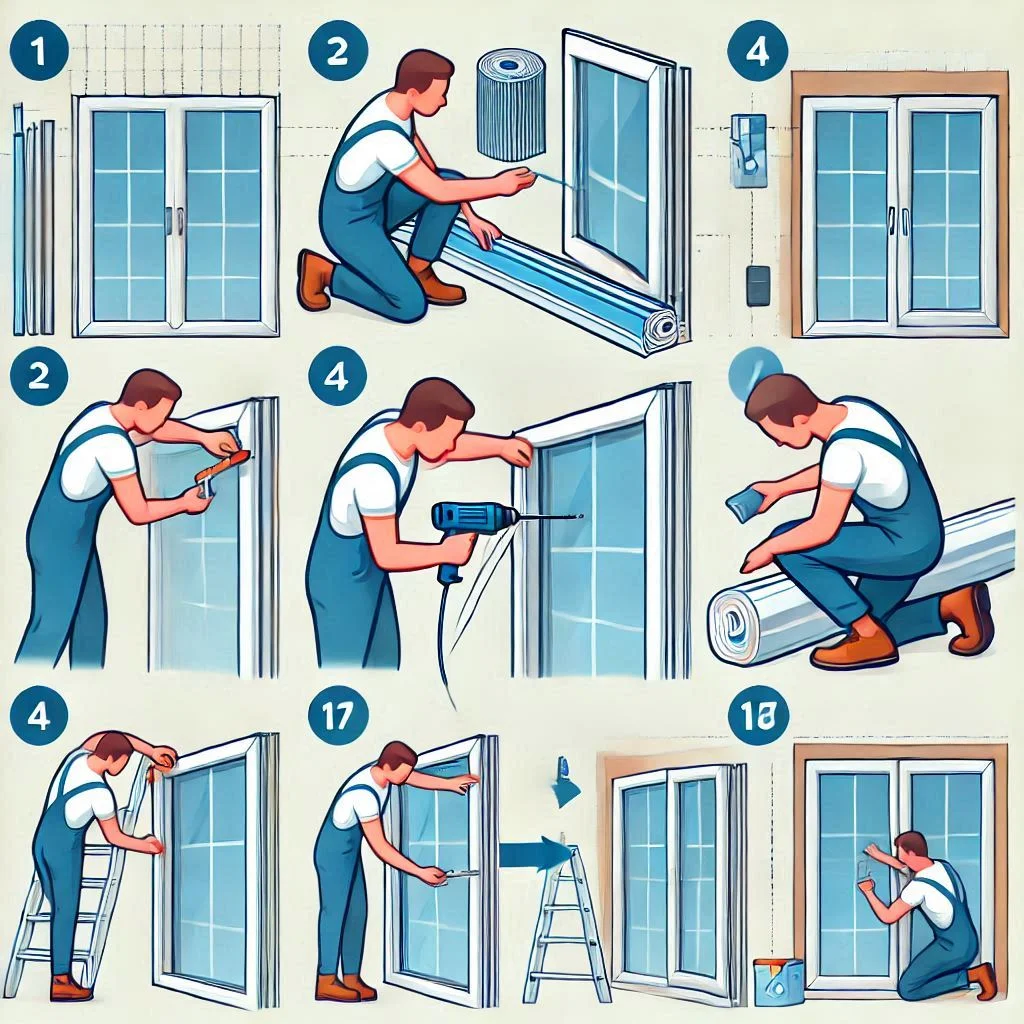
Step-by-Step Process to Build a DIY Window Seal
Creating a DIY air conditioner window seal is a straightforward process that enhances the performance of your portable air conditioner. Follow these step-by-step instructions for a custom-fit, durable, and energy-efficient solution for your home.
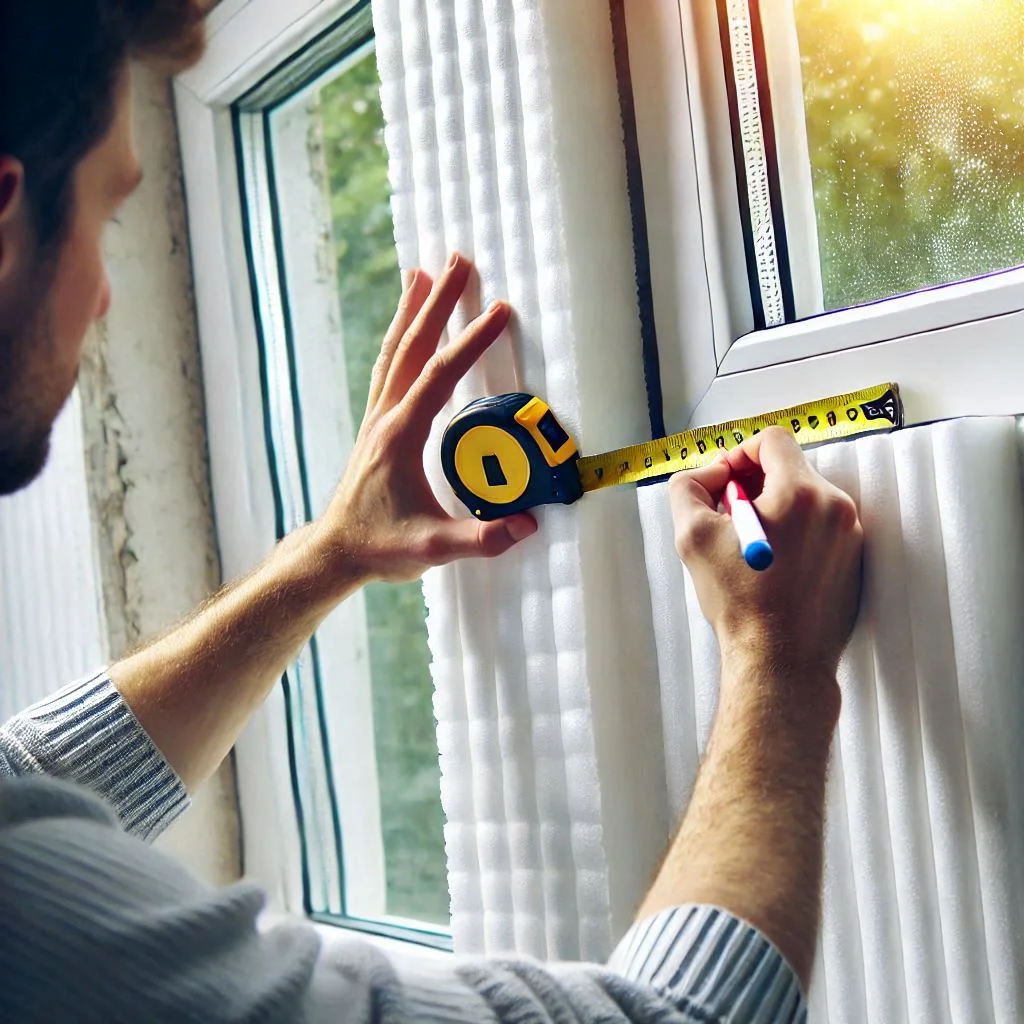
Step 1: Measure and Cut the Polystyrene Board
Accurate measurements are the foundation of a successful window seal.
- Measure the Window Frame:
- Use a measuring tape to determine the height and width of the window opening. Ensure precision to avoid air gaps.
- Note: If the window has uneven dimensions, take multiple measurements at different points.
- Cut the Polystyrene Board:
- Place the board on a flat surface and mark the cutting lines using a marker and straight edge.
- Use a utility knife or cutter to cut the board along the marked lines.
- Test the board in the window frame to ensure a snug fit.
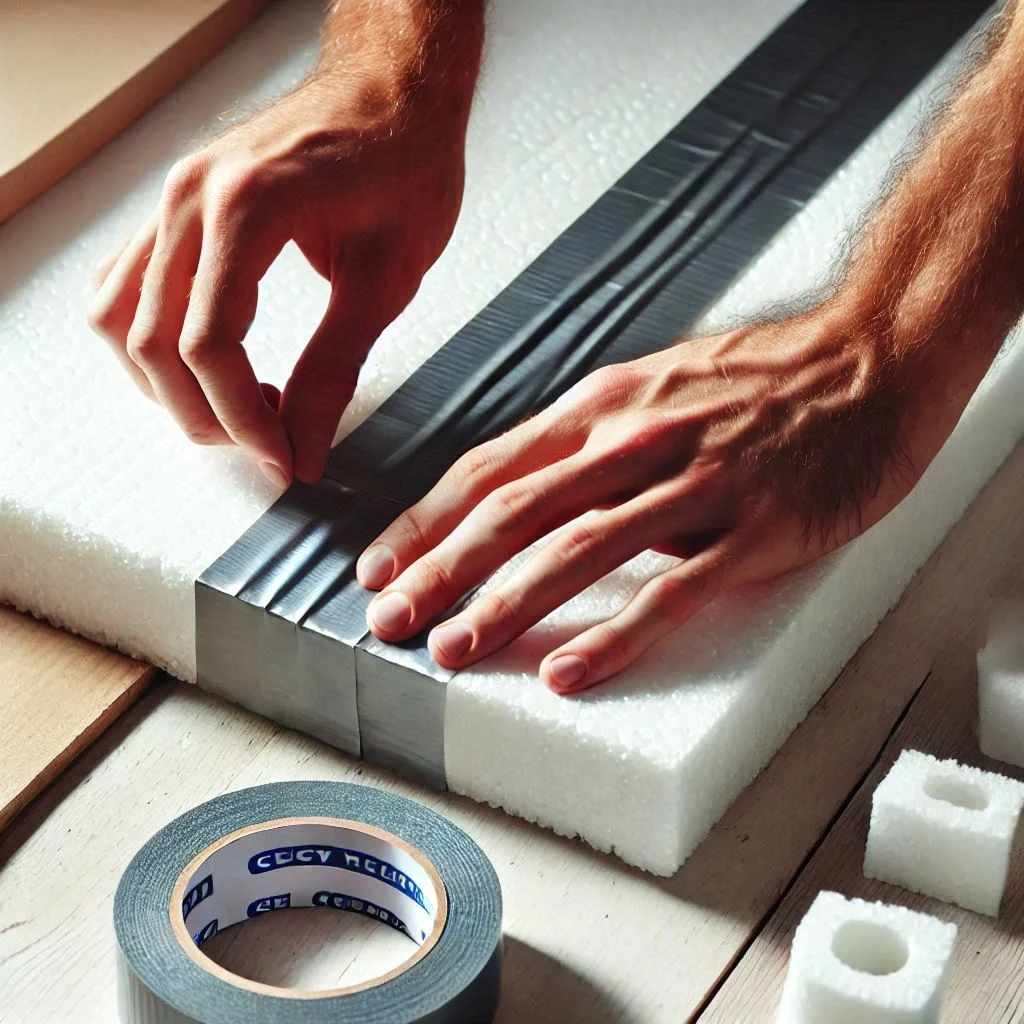
Step 2: Reinforce the Edges for Durability
The edges of the polystyrene board are prone to wear and tear. Reinforcing them ensures longevity.
- Apply Duct Tape:
- Cover all edges of the polystyrene board with duct tape. This prevents chipping and strengthens the seal.
- For added protection, you can fold the tape over the edges to create a smooth finish.
- Check for Stability:
- Ensure the reinforced edges don’t interfere with the board’s fit in the window frame.
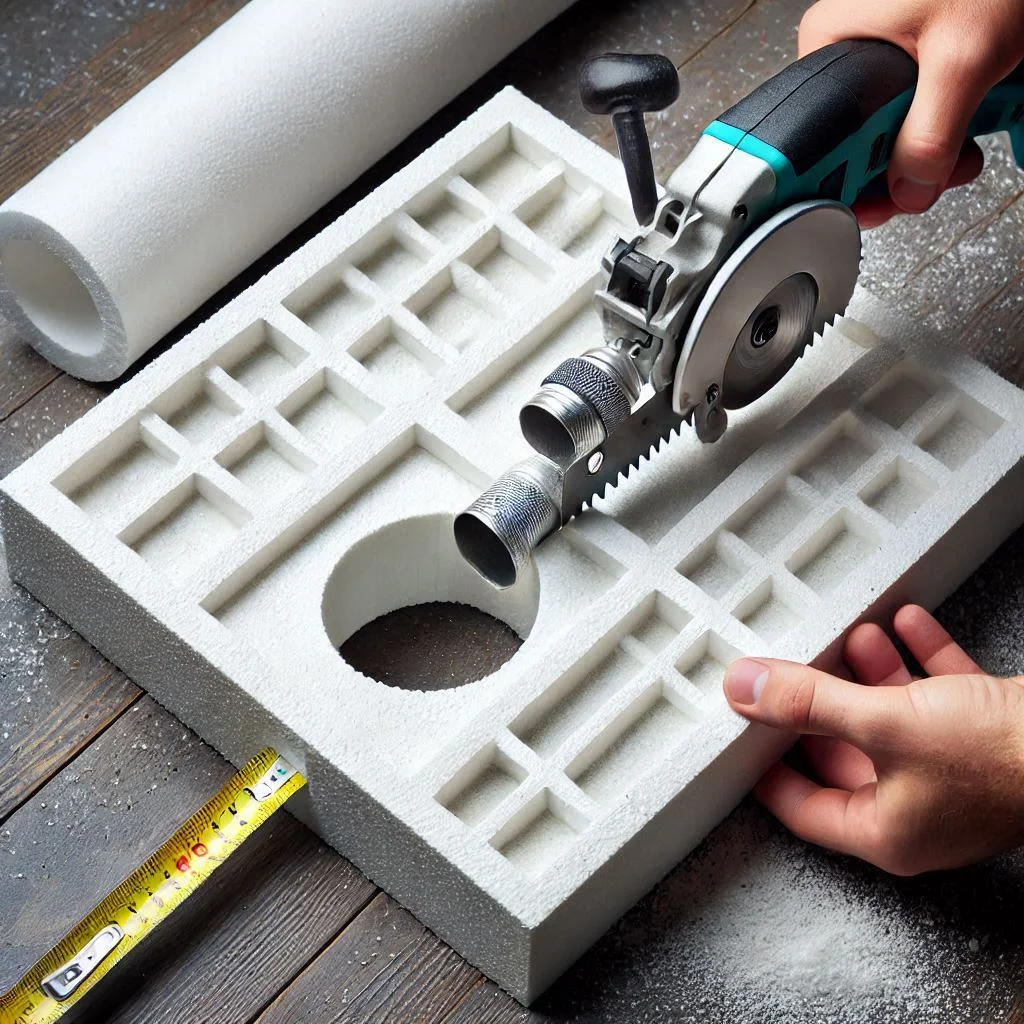
Step 3: Create an Opening for the Vent Pipe
This step is critical for connecting your portable air conditioner to the window seal.
- Mark the Pipe Hole:
- Place the vent pipe flange or gasket on the polystyrene board where the exhaust will exit.
- Trace the outline of the flange with a marker.
- Cut the Hole:
- Use a utility knife or a hole saw to cut the opening. Ensure the cut is smooth and matches the size of the pipe flange.
- Test-fit the vent pipe to confirm a snug fit.
Step 4: Add Insulation for Energy Efficiency
Enhance the thermal efficiency of your window seal with insulation foil.
- Cut the Insulation Foil:
- Measure and cut a piece of insulation foil to cover the entire polystyrene board.
- Leave a small gap around the vent hole to avoid obstructing the pipe.
- Attach the Foil:
- Use adhesive or duct tape to secure the foil to the board. Smooth out any wrinkles for a neat finish.
- Double Layer for Extra Efficiency:
- Consider adding a second layer of foil if your window is exposed to direct sunlight.
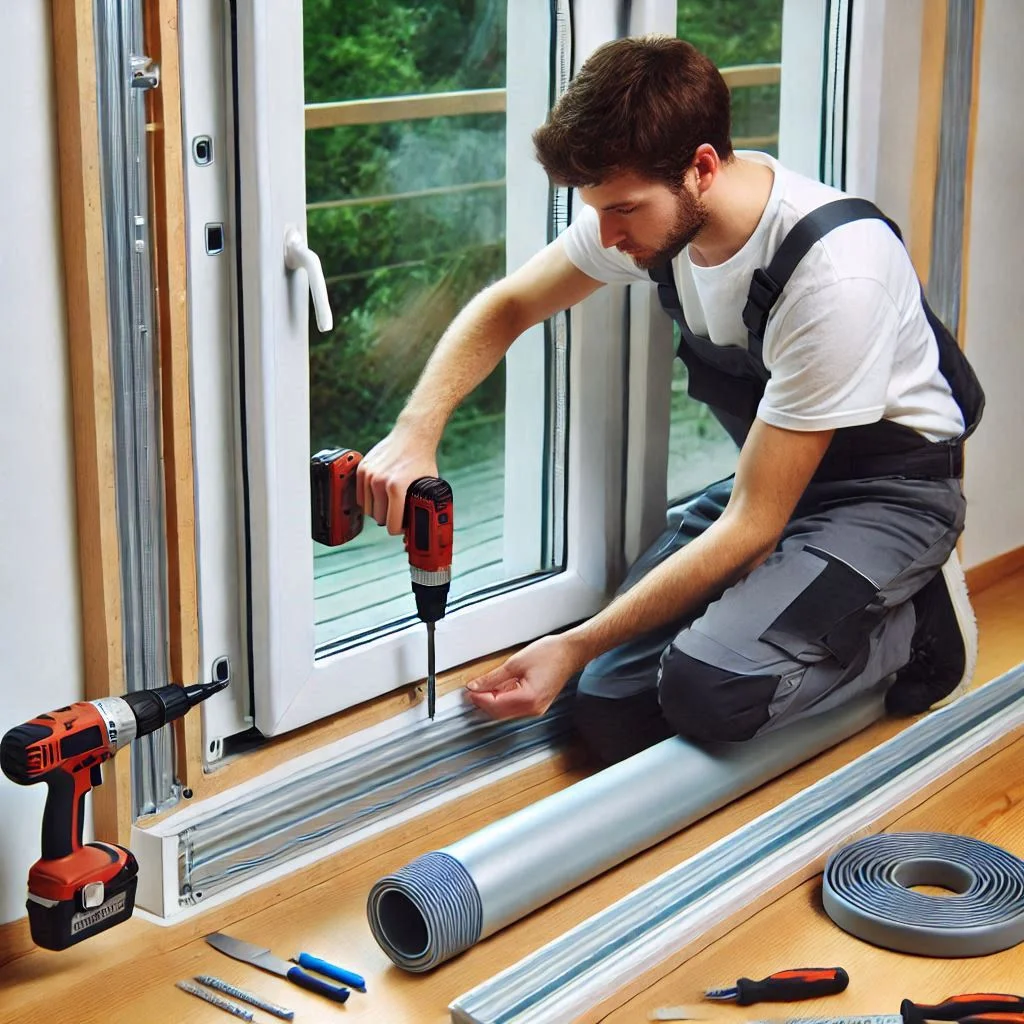
Step 5: Install the Window Seal Panel
The final step is securing the completed seal to your window frame.
- Fit the Panel:
- Place the polystyrene board with insulation into the window frame. Adjust as needed for a snug fit.
- Secure the Seal:
- Use Velcro strips or adhesive to attach the panel to the frame. Ensure no air gaps are left.
- Connect the Vent Pipe:
- Attach the vent pipe securely through the hole. Seal any minor gaps with duct tape for an airtight fit.
Advantages of a DIY Air Conditioner Window Seal
A DIY air conditioner window seal offers numerous benefits that go beyond simply improving cooling efficiency. From cost savings to a customizable design, this innovative solution is perfect for homeowners seeking comfort and sustainability. Below, we explore the key advantages of building your own window seal.
Improved Cooling Efficiency
- Minimizes Air Leakage:
- A DIY window seal blocks gaps and prevents warm air from entering your home. This allows your portable air conditioner to operate at peak efficiency.
- Enhances Airflow Control:
- By sealing the window tightly, the cool air generated by the air conditioner is directed entirely into the room rather than escaping through cracks.
- Maintains Consistent Temperature:
- A properly sealed window ensures that your room stays cool and comfortable without constant temperature fluctuations.
Reduced Energy Costs
- Lower Electricity Bills:
- By preventing air leaks, your air conditioner doesn’t have to work as hard to maintain the desired temperature. This leads to significant energy savings over time.
- Eco-Friendly Benefits:
- An efficient air conditioner consumes less power, reducing your carbon footprint. A DIY window seal contributes to a more sustainable household.
- Seasonal Versatility:
- During cooler months, the seal can prevent drafts from entering, further reducing heating costs.

Customizable and Reusable Design
- Tailored to Your Needs:
- Unlike store-bought window seals, a DIY solution can be custom-fit to your specific window size and shape, ensuring a perfect match.
- Adjust the design based on your air conditioner model and personal preferences.
- Durability and Reusability:
- With quality materials like polystyrene and insulation foil, your DIY window seal can last for several years.
- The reusable design makes it easy to store and reinstall when needed.
- Budget-Friendly:
- Building your own window seal saves you the cost of purchasing expensive pre-made options.
- The materials used are not only affordable but also widely available.

Total Build Time and Cost Estimation
Constructing a DIY air conditioner window seal is not only simple but also time-efficient and cost-effective. Below, we provide a detailed breakdown of the total build time and estimated cost to help you plan your project.
Estimated Build Time: 1–2 Hours
- Measuring and Cutting (20–30 Minutes):
- Measuring the window frame and cutting the polystyrene board to fit takes the majority of the initial time.
- Accurate cuts are essential to ensure a snug and efficient seal.
- Reinforcing Edges (10–15 Minutes):
- Applying duct tape or cloth tape around the edges to strengthen the board and prevent wear is a quick but crucial step.
- Creating the Vent Pipe Opening (15–20 Minutes):
- Marking and cutting the hole for the vent pipe requires attention to detail. Using a hole saw or utility knife ensures precision and adds a few extra minutes.
- Adding Insulation (15–20 Minutes):
- Covering the board with insulation foil and securing it with adhesive or tape doesn’t take long but provides substantial energy efficiency benefits.
- Installation (10–15 Minutes):
- Fitting the panel into the window frame and securing it with Velcro or adhesive completes the process. Ensuring no gaps are left might take an extra few minutes.

Approximate Cost: Under $30 (Depending on Materials)
- Polystyrene Board ($10–$15):
- The primary material for the window seal, is available at most hardware or craft stores.
- Duct Tape ($5):
- A small roll of heavy-duty, weather-resistant duct tape suffices for this project.
- Insulation Foil ($5–$10):
- Reflective insulation foil adds energy efficiency and costs only a few dollars for a single roll.
- Velcro Strips or Adhesive ($5):
- A pack of Velcro strips or a tube of adhesive is affordable and widely available.
- Optional Costs:
- If you don’t already have tools like a utility knife or measuring tape, factor in an additional $5–$10 for basic equipment.

Benefits of a Quick and Affordable Project
- Efficient Use of Time:
- With a build time of just 1–2 hours, this project can be completed in a single afternoon, making it ideal for those with busy schedules.
- Budget-Friendly Solution:
- For under $30, you can create a high-quality window seal that saves energy and enhances cooling efficiency.
- Reusable Investment:
- Once built, the DIY seal can be reused for years, making it a cost-effective long-term solution.

DIY Air Conditioner Window Seal Video Guide
A step-by-step video guide can significantly enhance your understanding of creating a DIY air conditioner window seal. Videos provide a visual demonstration of the process, making it easier to follow along and achieve professional results. Below, we explore the importance of a video tutorial, how to approach the project visually, and key features to include in your video.
The Value of a Video Guide
- Clear Visual Instructions:
- Watching the process unfold in a video eliminates guesswork. You can observe the exact techniques used to measure, cut, and assemble the seal.
- Simplified Learning Curve:
- Even if you’re new to DIY projects, a video guide simplifies complex steps by breaking them into manageable tasks.
- Higher Engagement:
- Video content is more engaging than text alone, helping you stay focused and motivated throughout the project.

Steps Covered in the Video
- Introduction (0:00–1:00)
- Brief overview of the purpose of the project and the materials/tools required.
- Measuring and Cutting (1:01–5:00)
- Demonstration of how to measure the window frame accurately and cut the polystyrene board to size.
- Reinforcing Edges (5:01–7:00)
- Visual guidance on applying duct tape to strengthen the edges of the polystyrene board.
- Cutting the Vent Pipe Hole (7:01–10:00)
- Step-by-step instructions for marking and cutting the hole for the air conditioner vent pipe.
- Adding Insulation (10:01–12:00)
- How to attach insulation foil to the polystyrene board for better energy efficiency.
- Installing the Seal (12:01–15:00)
- Final installation process, including fitting the panel into the window and securing it.

Tips for Creating or Choosing the Perfect Video Guide
- Use Clear Camera Angles:
- Ensure all steps are filmed from angles that clearly show the process. Overhead shots for cutting and close-ups for detailed work are especially helpful.
- Include On-Screen Text:
- Add captions or labels during key moments in the video, such as material names or measurements, for better clarity.
- Highlight Mistakes to Avoid:
- Showing common errors and how to fix them helps viewers avoid pitfalls during their project.
- Keep It Concise:
- Aim for a video length of 10–15 minutes to maintain viewer engagement without skipping essential details.

FAQs: DIY Air Conditioner Window Seal
Providing answers to frequently asked questions about creating a DIY air conditioner window seal ensures clarity and addresses common concerns for users. This section not only enhances user experience but also improves search engine rankings by offering valuable, detailed content.
Q1: Why do I need a window seal for my portable air conditioner?
A window seal is essential for optimizing the performance of your portable air conditioner. It serves two primary purposes:
- Improved Cooling Efficiency: By preventing warm air from entering the room, the air conditioner can cool the space faster and more effectively.
- Energy Savings: With less heat intrusion, your unit uses less energy, leading to reduced electricity bills.
Without a proper seal, warm outdoor air can mix with the cooled indoor air, forcing your air conditioner to work harder and consume more power.

Q2: Can I use any material for the seal?
While you can use various materials, it’s best to select ones with good insulating properties for better results. Recommended materials include:
- Polystyrene or Foam Boards: Lightweight, durable, and excellent at blocking heat transfer.
- Insulation Foil: Enhances thermal resistance and reflects heat effectively.
- Duct Tape or Cloth Tape: For reinforcing edges and securing components.
Avoid materials that are prone to warping, tearing, or conducting heat, such as cardboard or thin plastics.
Q3: How do I ensure the vent pipe hole fits perfectly?
Achieving a snug fit for the vent pipe is crucial to prevent air leakage. Follow these steps for precision:
- Measure Accurately: Use a measuring tape to determine the exact diameter of the vent pipe. Add 1–2 mm clearance for easy installation.
- Mark the Cut Area: Trace the pipe’s outline onto the polystyrene board using a pencil or marker.
- Use the Right Tool: A hole saw, utility knife, or cutter is ideal for creating a clean, circular cut. Work slowly to avoid errors.
A well-fitted hole ensures maximum cooling efficiency and prevents outdoor air from seeping inside.
Q4: Is this DIY project suitable for all window types?
This project is most effective for:
- Sliding Windows: The rectangular shape of the seal easily fits into sliding window frames.
- Casement Windows: The seal can be customized to fit these hinged windows with minimal adjustments.
For non-standard windows, such as arched or irregularly shaped designs, additional customization may be necessary. For instance, you may need to cut the polystyrene board into unique shapes or use flexible sealing materials.
Pro Tip: Always test the fit before completing the installation to ensure proper alignment and sealing.
Q5: Can I reuse the DIY window seal?
Yes, the DIY window seal is reusable if you handle it carefully during removal and storage. Follow these tips:
- Detach Gently: Avoid pulling or tearing the seal when removing it from the window frame.
- Store in a Cool, Dry Place: Protect the seal from extreme temperatures or moisture, which can degrade its components.
- Inspect Before Reuse: Check for damage, such as cracks or torn edges, and repair with duct tape if necessary.
Reusability makes this DIY project a cost-effective solution for multiple seasons.
Conclusion
Creating a DIY air conditioner window seal is a cost-effective and efficient way to enhance the performance of your portable air conditioner. This project not only improves cooling efficiency by preventing warm air from entering but also reduces energy costs, making it an eco-friendly solution for your home. With readily available materials, simple tools, and a few hours of effort, you can build a durable and reusable window seal tailored to your specific needs.
By following this comprehensive guide, you’ll gain the confidence to complete the project successfully while enjoying a more comfortable and energy-efficient space. Whether you’re a DIY enthusiast or a beginner, this step-by-step process, supported by clear instructions and visual aids, ensures a seamless experience. Start your project today and experience the benefits of a well-insulated and efficient cooling solution!