
Introduction to DIY Air Conditioner Fence Covers
Why Build a DIY Air Conditioner Fence?
Building a DIY air conditioner fence is a practical and aesthetically pleasing way to improve your outdoor space. It serves multiple purposes, offering both protection for your AC unit and an attractive addition to your yard. Whether you want to enhance the look of your outdoor area or extend the lifespan of your air conditioning unit, constructing a DIY fence is an excellent solution. The fence can provide shelter from harsh weather conditions, dirt, debris, and potential damage from outdoor elements, ensuring that your AC unit runs efficiently year-round.
A well-built air conditioner fence also helps with maintaining privacy, especially if your AC unit is placed in a visible or unsightly spot. Additionally, by using the right materials, you can add decorative elements that seamlessly blend with the style of your home and garden. This is particularly important if your AC unit is located in an area where appearance matters, such as near a patio, driveway, or garden.
Benefits of a DIY Air Conditioner Fence:
- Enhanced Protection: A fence keeps debris, dirt, leaves, and small objects from entering the AC unit’s vents, improving its performance and longevity.
- Aesthetic Appeal: Customize the design of your fence to complement the look of your home’s exterior, garden, or backyard.
- Privacy and Concealment: The fence can hide the AC unit from view, adding to the privacy of your outdoor space.
- Easy Maintenance: A properly designed fence makes it easier to clean and maintain your AC unit by providing more space around it.
- Cost-Effective Solution: Building your own fence is a budget-friendly option that allows you to control the materials, design, and installation process.

Materials and Tools Required for Building a DIY Air Conditioner Fence
To build a durable and effective DIY air conditioner fence, you’ll need to gather specific materials and tools. Here’s an overview of what you’ll need to get started:
Materials:
- Wood (Pressure-Treated or Untreated): The wood you choose will depend on your budget and the weather conditions in your area. Pressure-treated wood is ideal for outdoor use due to its ability to withstand moisture, while untreated wood may require additional treatment to prevent rot.
- Nails, Screws, and Wood Glue: For securing the parts together and ensuring that the fence remains stable and long-lasting.
- Exterior Wood Stain or Paint: To protect the wood from the elements and add color to the fence. Make sure to choose a stain or paint designed for outdoor use to ensure maximum durability.
- Fence Spikes or Posts: To anchor the fence into the ground, providing stability.
- Lattice or Slats: If you choose a design with gaps or an open fence style, these materials help ensure airflow around the AC unit.
- Top Trim (Optional): To add a polished look to the top of your fence.
Tools:
- Saw: For cutting the wood to the desired size.
- Measuring Tape and Level: To ensure accuracy while constructing your fence.
- Hammer or Drill: For driving nails or screws into the wood.
- Shovel or Post Hole Digger: If you’re installing fence posts, you’ll need this tool to dig holes in the ground.
- Paintbrush or Sprayer: To apply the exterior wood stain or paint evenly.

How to Get Started
Before you dive into your DIY air conditioner fence project, take the time to plan and measure the space around your AC unit. Assess the location, taking into account accessibility for maintenance and airflow around the unit. Proper planning is key to ensuring your fence is both functional and aesthetically pleasing.
In the following sections, we’ll guide you step-by-step through the process of building your own DIY air conditioner fence. Whether you’re a seasoned DIYer or a first-time builder, these instructions will help you complete the project efficiently.
Materials and Tools Needed for Your DIY Air Conditioner Fence
Building a DIY air conditioner fence requires careful selection of materials and tools to ensure durability, functionality, and aesthetic appeal. Whether you are a beginner or an experienced DIY enthusiast, understanding the materials and tools needed is crucial to creating a sturdy and long-lasting fence for your AC unit. Below, we provide an in-depth guide to the essential materials and tools for this project.
Materials for Building a DIY Air Conditioner Fence
Choosing the right materials will significantly impact the look and lifespan of your DIY air conditioner fence. Below is a list of common materials used in constructing a sturdy and attractive fence around your air conditioning unit.
1. Wood Types:
- Pressure-Treated Wood: Pressure-treated wood is one of the best choices for outdoor projects like an air conditioner fence. It has been chemically treated to resist rot, decay, and insect damage, making it ideal for use in areas exposed to the elements. It provides long-lasting protection for your fence, especially in humid or rainy climates.
- Untreated Wood (Cedar, Pine, etc.): Untreated wood, such as cedar or pine, can be used for a more natural aesthetic, though it will require additional treatments (such as sealing or staining) to prevent weathering and damage. Cedar, in particular, is naturally resistant to insects and moisture, making it a good choice for outdoor use.
- Composite Wood: Composite wood, made from a blend of wood fibers and plastic, is an excellent option for a low-maintenance fence. It is resistant to fading, cracking, and splintering, though it can be more expensive than natural wood types.
2. Nails and Screws:
- Galvanized Nails: For a sturdy and rust-resistant structure, galvanized nails are ideal. These nails are coated with zinc to prevent corrosion, ensuring that your fence can withstand exposure to moisture and weather.
- Wood Screws: Wood screws provide better holding power than nails and are less likely to loosen over time. Use screws for attaching horizontal slats or panels to vertical posts for added stability.
3. Exterior Wood Stain or Paint:
- Wood Stain: Applying a wood stain is essential to protect the fence from UV rays and moisture. Choose an exterior stain that penetrates the wood and enhances its natural grain, while providing protection against water damage. Stains are available in various colors to match your outdoor decor.
- Outdoor Paint: If you prefer a more vibrant or opaque finish, outdoor paint can provide long-lasting color and protection for your fence. Be sure to choose paint that is specifically designed for outdoor use to ensure durability and resistance to fading.

4. Lattice or Wooden Slats:
- Lattice Panels: Lattice panels can add a decorative touch to your air conditioner fence while allowing air to circulate freely around the AC unit. Lattice is an excellent option if you want to create a more open, airy fence design while still providing coverage.
- Wooden Slats: For a more solid fence, wooden slats are a great choice. Slats provide privacy while still allowing some airflow, making them ideal for surrounding your air conditioner unit.
5. Fence Posts and Post Anchors:
- Wooden Fence Posts: Depending on the design and height of your fence, you’ll need sturdy wooden fence posts to anchor the fence into the ground. These posts are essential for ensuring the stability and longevity of the fence.
- Post Anchors: If you want to avoid digging deep holes for the posts, post anchors are a convenient alternative. They allow you to secure your posts to the ground without the need for extensive digging.
Tools Needed for Your DIY Air Conditioner Fence
To build a successful air conditioner fence, you’ll need a few basic tools to cut, measure, assemble, and secure the materials. Below are the essential tools required for the project.
1. Saw:
- A saw is necessary for cutting the wood to the appropriate size. You can use a circular saw for straight cuts or a miter saw for angled cuts. Ensure that your saw blade is suitable for cutting through the type of wood you’re using.
2. Measuring Tape and Level:
- Measuring Tape: Accurate measurements are key to ensuring that the fence fits around your AC unit properly. A 25-foot measuring tape should be sufficient for most DIY air conditioner fence projects.
- Level: A level tool ensures that the posts and slats are aligned correctly, preventing a crooked or uneven fence.
3. Hammer or Drill:
- Hammer: If you’re using nails, a hammer will be required to drive them into the wood.
- Drill: A drill is needed for pre-drilling holes for screws or installing posts. A cordless drill is ideal for mobility and ease of use.
4. Post Hole Digger (Optional):
- If you’re installing fence posts in the ground, a post hole digger will help you create deep, narrow holes for anchoring the posts. If you’re using post anchors, this tool may not be necessary.
5. Paintbrush or Sprayer:
- A paintbrush or sprayer is needed to apply the exterior wood stain or paint evenly. A sprayer is a faster option for large surfaces, while a paintbrush offers more control for intricate areas.

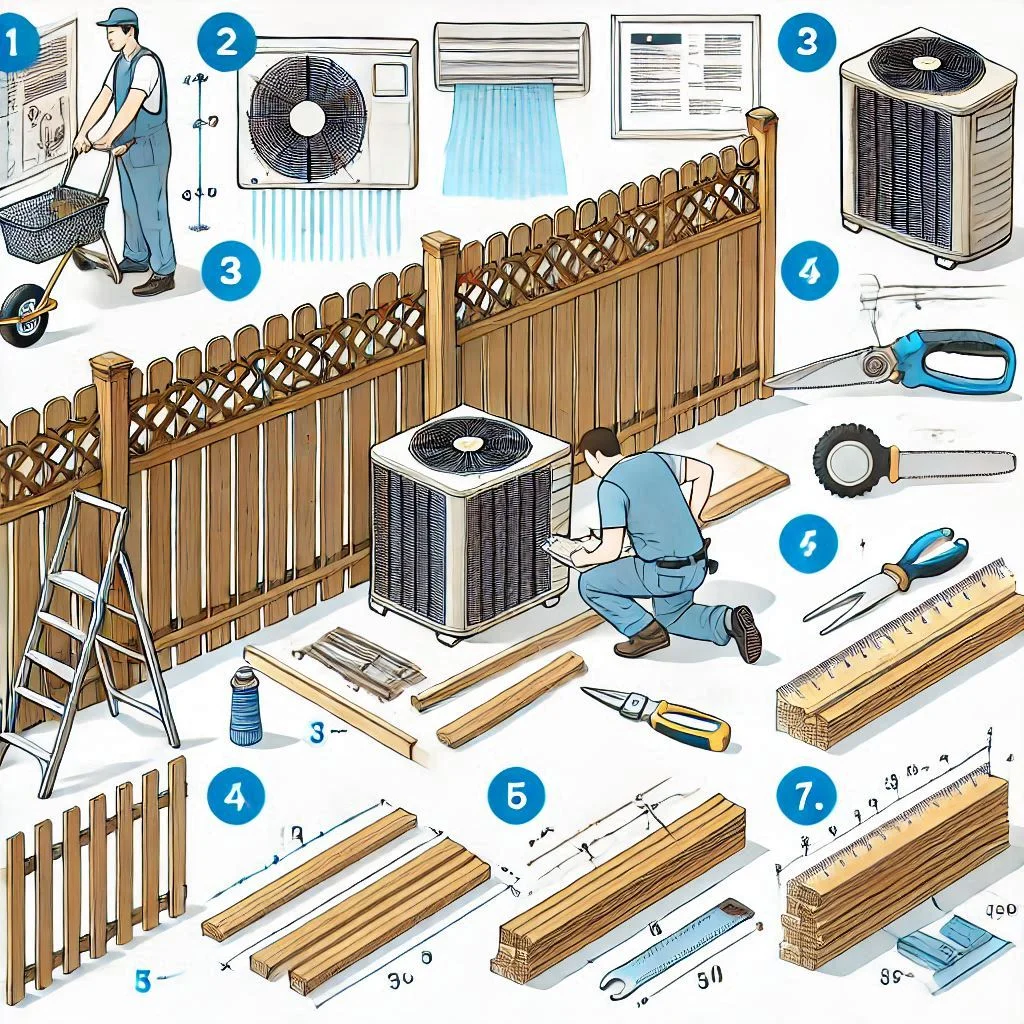
Step-by-Step Guide to Building Your DIY Air Conditioner Fence
Building a DIY air conditioner fence is a rewarding project that not only improves the aesthetics of your outdoor space but also provides protection for your air conditioning unit. Follow this detailed step-by-step guide to ensure a successful build from start to finish.
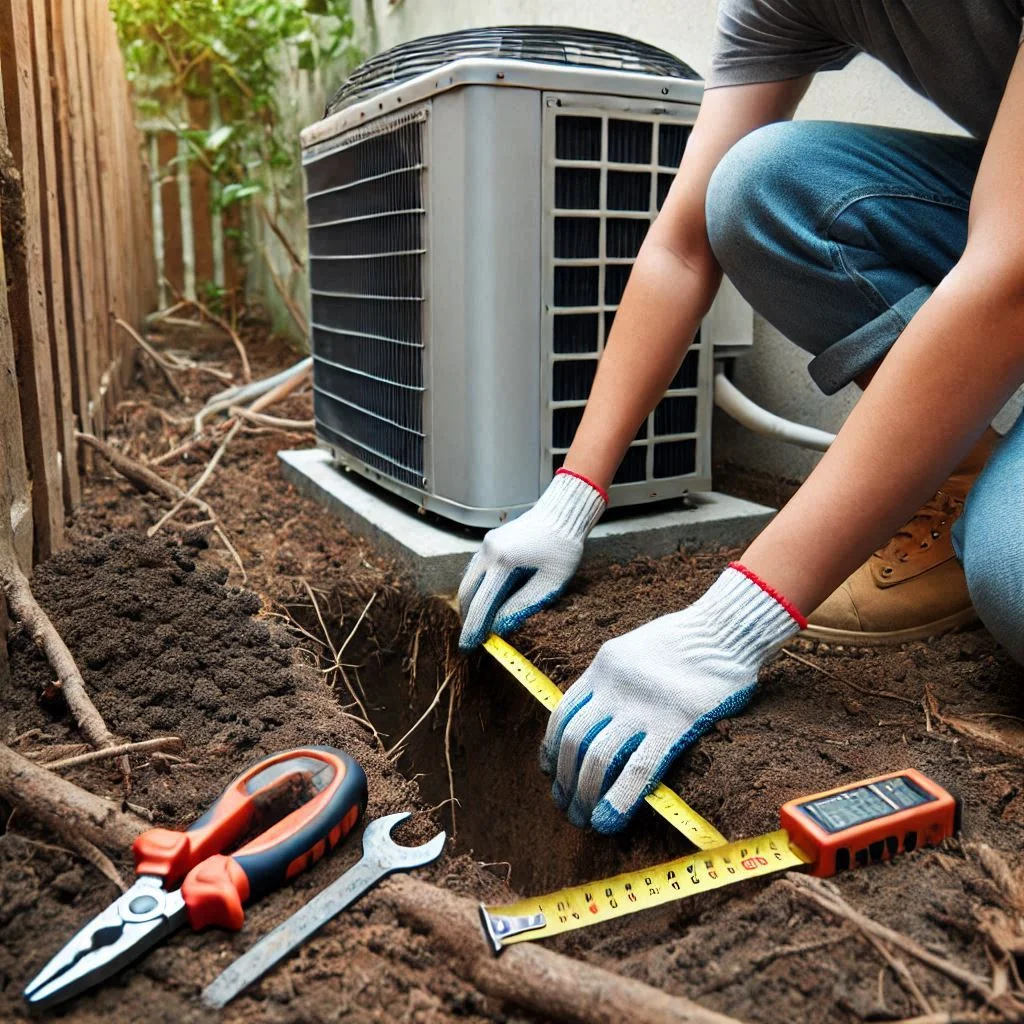
Step 1: Prep the Ground Around the AC Unit
Before you begin constructing your DIY fence, it’s essential to prepare the area around the AC unit. This ensures proper placement and access for future maintenance. Start by clearing any debris, weeds, or obstacles from the area around the unit. Measure the distance between the AC unit and the proposed fence to ensure there is adequate airflow, which is critical for the efficient operation of the unit.
Key Points for Prep:
- Clear the area of any dirt, leaves, or plants that may obstruct your work.
- Use a measuring tape to confirm the space required for proper air circulation around the AC.
- Level the ground if needed to ensure a stable foundation for the fence posts.
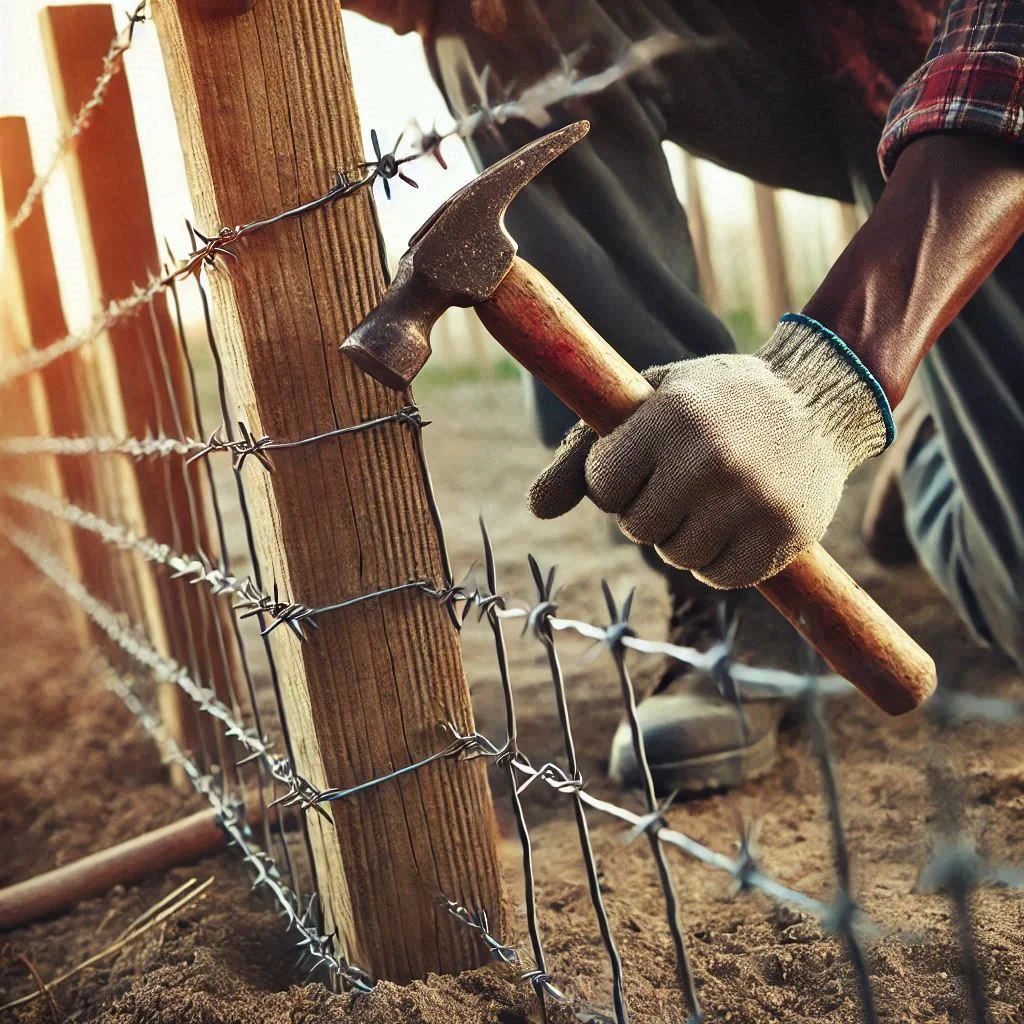
Step 2: Install Fence Spikes and Poles
Next, install fence spikes or posts to anchor your DIY fence into the ground. This step is crucial for the stability of your fence. Fence spikes are easy to install and ideal for smaller fences, while fence posts provide more robust support for larger designs.
Installation Process:
- Fence Spikes: Drive the fence spikes into the ground using a hammer. Make sure they are spaced evenly according to your design.
- Fence Posts: If using posts, dig small holes with a post hole digger, place the posts in the holes, and secure them with concrete or gravel. Ensure the posts are plumb and level.
Step 3: Make Initial Lumber Cuts
Once the posts are in place, it’s time to cut the wood to the appropriate size. Measure and mark the lumber based on your desired fence dimensions. Use a saw to cut the wood to the correct lengths, including both horizontal slats and vertical posts.
Tip: It’s recommended to make all cuts at once to save time and ensure uniformity throughout the project. If using treated wood, wear protective gloves and safety goggles during cutting.
Step 4: Build the Long Part of the Fence
Start by assembling the long section of the fence. Lay the horizontal slats across the fence posts and ensure they are spaced evenly. Attach the slats to the posts using screws or nails for a strong hold. For a cleaner finish, pre-drill holes in the slats to prevent splitting.
Tip: If using lattice, lay it over the framework before securing it to the posts for a seamless look.
Step 5: Secure Horizontal Slats with Screws
With the slats positioned, secure them tightly to the posts using wood screws. Wood screws provide superior holding power compared to nails, ensuring your slats stay in place for years to come.
Installation Steps:
- Place the slats horizontally, ensuring equal spacing between each one for uniformity.
- Drill pilot holes and drive screws into the posts and slats at the appropriate intervals.
- Double-check the level of each slat before securing it completely.
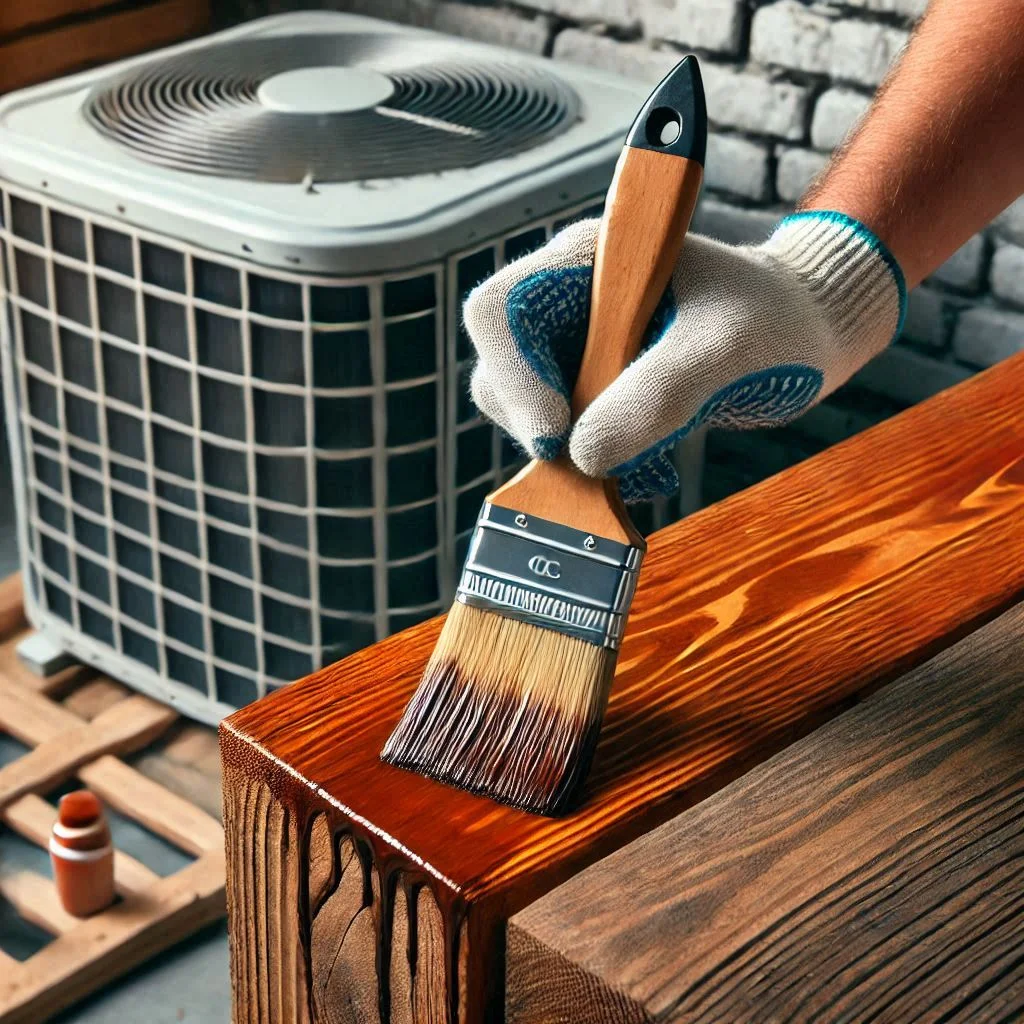
Step 6: Apply Exterior Wood Stain
Once the frame and slats are secured, apply a protective exterior wood stain to prevent damage from UV rays, moisture, and other outdoor elements. Staining not only protects the wood but also enhances its color and natural texture.
Application Tips:
- Use a brush or sprayer to apply the stain evenly across all surfaces.
- Ensure the stain is specifically formulated for outdoor use to withstand harsh weather conditions.
- Allow the wood to dry completely before moving on to the next step.

Step 7: Install the Long and Short Parts of the Fence
Now it’s time to assemble and install both the long and short parts of the fence. Start by attaching the longer sections to the posts, ensuring they are aligned properly. Once the long section is secured, attach the shorter sections to close off the fence around the air conditioner.
Tip: For a more seamless look, ensure all the slats are aligned properly, and use a level to check for evenness as you go.
Step 8: Finish with Top Trim (Optional)
To complete your DIY air conditioner fence, you can add a top trim for a polished, finished look. The trim can also help protect the top edge of the fence from weather damage. Use the same type of wood as the rest of the fence and cut it to size.
Installation Steps:
- Measure and cut the top trim to fit the length of the fence.
- Attach it securely using nails or screws, ensuring it is level across the entire top.
- If desired, apply the same wood stain to the trim to match the rest of the fence.
Final Tips for Your DIY Air Conditioner Fence
- Airflow: Make sure the fence allows sufficient airflow around the air conditioner unit for optimal performance.
- Maintenance: Choose durable materials and perform regular maintenance, such as staining or painting, to extend the lifespan of your fence.
- Design: Customize the fence to complement your home’s outdoor décor while still serving its primary function of protecting the AC unit.
Choosing the Right Materials: Unfinished Wood vs Pressure-Treated Wood
When building a DIY air conditioner fence, one of the most important decisions you’ll face is choosing the right type of wood. The two most common types used for outdoor projects are unfinished wood and pressure-treated wood. Each has its unique benefits and limitations, making it essential to choose the best option based on your project requirements, budget, and long-term goals.
In this section, we’ll explore the pros and cons of unfinished wood and the benefits of pressure-treated wood to help you make an informed decision for your DIY fence.
Pros and Cons of Unfinished Wood
Unfinished wood, such as cedar, pine, or redwood, is often preferred for its natural aesthetic and ease of use. It offers a rustic and organic look, making it a great option for those looking for a more natural and cost-effective approach to building their air conditioner fence.
Pros of Unfinished Wood:
- Natural Beauty: Unfinished wood is prized for its natural grain patterns, which can add warmth and character to your fence. The wood’s rich color can complement many outdoor settings and designs.
- Cost-Effective: Generally, unfinished wood is more affordable than pressure-treated wood, making it an attractive option for budget-conscious DIYers.
- Easier to Work With: Unfinished wood is easier to cut, sand, and shape compared to pressure-treated wood, which can be more difficult to work with due to its chemical treatment.
Cons of Unfinished Wood:
- Vulnerability to the Elements: Unfinished wood is more susceptible to damage from rain, sun, and humidity. Without proper treatment, it can warp, crack, and deteriorate over time.
- Requires Regular Maintenance: To prolong the lifespan of unfinished wood, it must be regularly stained or sealed. This can involve extra time, effort, and cost, as the finish will need to be reapplied periodically.
- Less Resistant to Insects and Decay: Unfinished wood can attract termites, ants, and other pests, which can compromise the integrity of your fence over time. It’s also prone to rotting when exposed to moisture.

Benefits of Using Pressure-Treated Wood for Outdoor Use
Pressure-treated wood is wood that has been chemically treated to resist decay, insects, and other environmental damages. It is often considered the best choice for outdoor projects where durability and longevity are key.
Benefits of Pressure-Treated Wood:
- Superior Durability: Pressure-treated wood is designed to withstand the harshest outdoor conditions, including high humidity, rain, and direct sunlight. The treatment helps prevent rot, mold, and mildew, making it ideal for fences exposed to the elements.
- Resistant to Insects: One of the main advantages of pressure-treated wood is its resistance to termites, ants, and other pests that can damage wooden structures. This makes it an excellent option if you live in areas with high insect activity.
- Longer Lifespan: Pressure-treated wood typically lasts much longer than untreated or unfinished wood. With proper maintenance, it can last for decades without significant degradation, saving you money on future repairs and replacements.
- Low Maintenance: Unlike unfinished wood, which requires frequent staining and sealing, pressure-treated wood requires minimal maintenance. An occasional cleaning and inspection will usually suffice.
- Strength and Stability: Pressure treatment enhances the wood’s strength, making it more resistant to warping, shrinking, and bending. This can help ensure that your air conditioner fence remains stable and secure over time.
Cons of Pressure-Treated Wood:
- Higher Initial Cost: Pressure-treated wood is more expensive than untreated wood, so it requires a higher initial investment. However, this cost is offset by its longer lifespan and reduced need for maintenance.
- Chemical Treatment: The chemicals used in the treatment process can sometimes give pressure-treated wood a slightly unnatural appearance. Additionally, the chemicals used may be harmful to the environment if not disposed of properly.
- Workability: Due to the chemical treatment, pressure-treated wood can be more difficult to work with, particularly when cutting or sanding. It’s important to wear safety gear, such as a mask and goggles, when handling this type of wood.

Final Thoughts: Which Wood is Right for Your DIY Air Conditioner Fence?
Both unfinished wood and pressure-treated wood offer unique benefits depending on your project needs. If you’re seeking a natural, budget-friendly material and are willing to perform regular maintenance, unfinished wood might be the right choice for your DIY air conditioner fence. On the other hand, if you want a more durable, low-maintenance solution that can withstand the elements and pests for years, pressure-treated wood is the better investment.
When deciding, consider factors such as your climate, your ability to perform maintenance, and how long you expect the fence to last. For long-term durability and minimal upkeep, pressure-treated wood is often the preferred choice, especially for outdoor fences like those around your air conditioner.

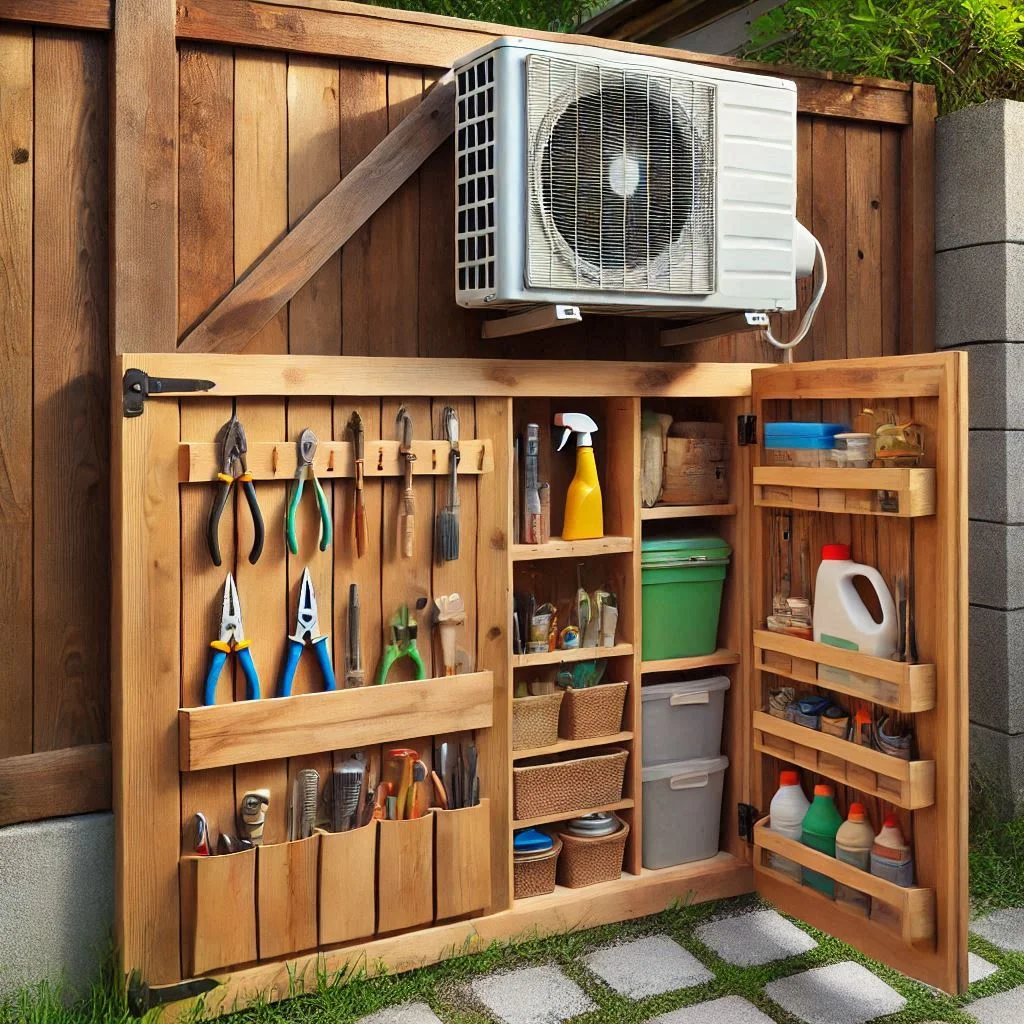
DIY Air Conditioner Fence Design and Size with Hidden Outdoor Storage
When building a DIY air conditioner fence, many homeowners are looking for more than just a way to enclose their AC unit. They want a design that not only hides the unit but also incorporates additional storage space. By combining both functionality and aesthetics, you can create a stylish, space-saving solution for your outdoor area.
In this section, we’ll explore creative design ideas for air conditioner fences with added storage options, as well as tips for determining the right size based on the space and the AC unit itself.
Creative Design Ideas for Air Conditioner Fences with Added Storage Options
A DIY air conditioner fence doesn’t have to be a plain, utilitarian structure. You can make it both functional and aesthetically pleasing by incorporating hidden outdoor storage. Here are a few design ideas that will help you achieve a multi-purpose fence for your AC unit:
- Lattice Panels with Storage Compartments
- Lattice panels are perfect for creating a semi-open design that still provides privacy and hides your AC unit. Beneath the lattice, you can build small shelves or cabinets to store garden tools, cleaning supplies, or outdoor cushions. This design ensures that your fence remains lightweight and breathable while maximizing storage space.
- Wooden Cabinet Storage
- If you need more enclosed storage, consider incorporating a wooden cabinet or cupboard design into your air conditioner fence. You can build a small cabinet beneath or beside the AC unit to house outdoor accessories such as hoses, fertilizer, or small gardening tools. This design hides clutter and offers additional storage for your backyard.
- Benches with Storage Underneath
- If you’re looking for a more comfortable and functional design, consider adding a bench seat with built-in storage beneath the air conditioner. This is a great solution if you have limited space and need a place to sit while still keeping your AC unit covered. The storage space beneath the bench can be used to store cushions, outdoor blankets, or tools.
- Vertical Storage with Shelves
- In smaller outdoor spaces, vertical storage is a great option. By adding shelves or a vertical cabinet on one side of the AC unit, you can store small items such as plants, pots, or decorative pieces. This maximizes the use of vertical space while keeping the AC unit hidden from view.

How to Determine the Right Size for Your Fence Based on the Space and AC Unit
When designing your DIY air conditioner fence, the size of the fence plays a crucial role in both the appearance and functionality of your space. Here are some important factors to consider when determining the right size for your fence:
- Measure the Dimensions of Your AC Unit
- The first step in determining the size of your fence is to measure the width, height, and depth of your air conditioner. These measurements will help you ensure that the fence covers the AC unit while still allowing for adequate airflow.
- Tip: Always leave at least 12 to 18 inches of space around the sides and back of the unit for proper ventilation.
- Allow Space for Airflow
- Proper airflow around the AC unit is crucial for its performance and longevity. When determining the size of the fence, ensure that the structure allows the air conditioner to breathe. A common guideline is to leave at least 2 to 3 feet of space around the AC unit. This ensures that air can circulate freely and prevents overheating.
- Consider the Storage Size
- If you’re incorporating hidden storage into the design of your fence, consider the items you plan to store. Ensure that there’s enough space for your desired storage solutions without crowding the air conditioner. For example, if you’re adding a bench with storage, ensure that the bench is tall enough to hide the unit and wide enough to store outdoor cushions or other items.
- Tip: If space is limited, opt for slim storage options like vertical shelving or small cabinets that don’t take up too much room.
- Account for Maintenance and Access
- It’s important to design your fence with maintenance in mind. You’ll need easy access to your AC unit for servicing, repairs, or cleaning. Ensure that your fence design includes a removable or hinged panel that provides easy access to the unit without needing to disassemble the entire structure.
- Tip: Consider using a sliding door or removable panel in your fence design for convenient access to the AC unit.
- Match the Fence Design to Your Outdoor Aesthetic
- Lastly, consider how the size of your fence fits into the overall aesthetic of your outdoor space. Whether you choose a minimalist design or one that incorporates additional storage, make sure the fence complements the style of your yard and home.
Final Thoughts: Creating a Functional and Stylish DIY Air Conditioner Fence with Storage
By incorporating hidden storage into your DIY air conditioner fence, you can maximize both functionality and style in your outdoor space. Whether you choose a simple lattice design, a built-in cabinet, or a bench with storage underneath, your fence can serve multiple purposes beyond just covering your AC unit.
Take the time to carefully measure your space and AC unit to ensure the fence is the right size for both ventilation and storage. With thoughtful planning, you’ll create a fence that not only hides your air conditioner but also enhances the overall appeal of your yard.
Fence Installation Considerations: Fence Spikes vs Fence Post Digger
When it comes to installing your DIY air conditioner fence, one of the most important decisions is how to secure the posts. The method you choose can significantly affect the stability and durability of the fence, especially when exposed to outdoor elements. Two common installation methods are fence spikes and fence post diggers. Both methods have their advantages and considerations, and understanding these will help you make an informed decision for your project.
In this section, we’ll compare fence spikes and fence post diggers, examining their benefits and drawbacks. We’ll also share tips to ensure your fence remains sturdy and long-lasting.
Comparison of Using Fence Spikes and Fence Post Digger for Installation
- Fence Spikes (Spike Anchors)
Fence spikes, also known as spike anchors, are a popular option for securing fence posts without the need for digging. These are metal spikes driven into the ground to anchor the fence posts. This method is often used in areas with hard or rocky soil, where digging might be difficult or time-consuming.
Pros of Using Fence Spikes:
- Quick and Easy Installation: Installing fence spikes is a faster process compared to digging holes for posts. You simply drive the spikes into the ground, attach the fence posts, and you’re done.
- No Need for Concrete: Fence spikes don’t require the use of concrete, which makes the installation process cleaner and less labor-intensive.
- Ideal for Hard or Rocky Soil: If you’re dealing with tough soil conditions, fence spikes provide an effective solution. They can easily penetrate harder ground without the need for digging deep post holes.
- Less Disruption: The installation process is less disruptive to the surrounding area, making it ideal for areas where minimal disturbance is preferred.
Cons of Using Fence Spikes:
- Less Stability in Loose Soil: While fence spikes work well in hard ground, they may not provide the same level of stability in loose or sandy soil. In such cases, the fence might become wobbly over time.
- Limited Height Flexibility: Fence spikes are better suited for shorter fences. For taller fences or those requiring extra support, you might need additional reinforcement.

- Fence Post Digger (Post Hole Digger)
A fence post digger, or post hole digger, is a tool used to dig holes in the ground for setting fence posts. This method involves digging a hole for each post, filling the hole with concrete, and setting the post into place. This traditional method ensures the posts are firmly anchored in the ground.
Pros of Using a Fence Post Digger:
- Superior Stability: Digging post holes and setting the posts in concrete provides a strong, stable foundation for your fence. This method works well in all soil types and ensures that your fence remains upright and secure for years.
- Long-Term Durability: The concrete helps protect the post from moisture and soil erosion, which means the fence is less likely to lean or become unstable over time.
- Versatility: Post diggers are versatile and suitable for a variety of fence types, including tall, heavy-duty fences that require more support.
Cons of Using a Fence Post Digger:
- Labor-Intensive: Digging holes for each fence post is a more time-consuming process compared to using fence spikes. It requires physical labor and additional tools, such as a post hole digger or auger.
- More Disruptive: This method involves digging up the ground, which can be more disruptive to the surrounding area. It also requires more cleanup after installation.
- Concrete Waiting Time: After placing the posts in concrete, you must wait for the concrete to set before proceeding with the rest of the installation, which adds to the total project time.

Tips for Ensuring Stability and Durability of the Fence
No matter which method you choose, ensuring the stability and durability of your DIY air conditioner fence is crucial for long-term performance. Here are some essential tips to ensure your fence remains sturdy:
- For Fence Spikes:
- Ensure Proper Depth: Drive the fence spikes deep into the ground for maximum stability. The deeper the spikes, the more secure the posts will be.
- Use Quality Spikes: Make sure to use high-quality, heavy-duty fence spikes made from rust-resistant materials to ensure long-lasting performance.
- Reinforce with Additional Support: For added stability, especially in areas with loose soil, consider adding extra bracing or support to the fence posts.
- For Fence Post Diggers:
- Proper Hole Size: Ensure that the holes are deep enough (about 1/3 of the total post height) and wide enough to accommodate the posts and concrete. This helps prevent the posts from shifting or leaning over time.
- Use Concrete for Extra Support: For added durability, use high-strength concrete to fill the post holes. Be sure to let the concrete set fully before continuing with the installation.
- Check Post Alignment: Make sure that the posts are perfectly aligned while setting them into the holes. Use a level to check vertical alignment, and adjust as needed before the concrete sets.
- General Tips:
- Consider Soil Conditions: Choose the installation method that suits your soil type. If the ground is particularly soft or sandy, using a fence post digger with concrete will provide better support.
- Regular Maintenance: Periodically check the fence for any signs of leaning, shifting, or wear. Tighten any loose fasteners, and if you notice any instability, consider adding extra support or adjusting the posts.
Final Thoughts: Choosing the Right Installation Method for Your DIY Air Conditioner Fence
When deciding between fence spikes and a fence post digger, consider your specific needs, the type of soil in your area, and the size of your fence. For a quick and easy installation, fence spikes might be the way to go, especially in areas with hard soil. However, for maximum stability and long-term durability, a post hole digger with concrete is the more reliable option.
No matter which method you choose, ensure that the installation is done correctly to provide a sturdy foundation for your fence. Properly installed, your DIY air conditioner fence will not only hide your unit but also serve as a durable addition to your outdoor space.
FAQs – Common Questions About DIY Air Conditioner Fences
When considering building a DIY air conditioner fence, many homeowners have questions regarding the best practices for installation, material selection, and additional features like storage. Below are the answers to some of the most common questions.
Q1: How do I make sure my DIY air conditioner fence is stable?
A1: Ensuring that your DIY air conditioner fence is stable is essential for both functionality and longevity. Here are a few key tips to make sure your fence remains upright and secure:
- Use Fence Spikes or Sturdy Posts:
When installing your fence, choose strong, durable fence posts that can withstand outdoor elements. Fence spikes are a good option for soft or rocky ground, while fence post diggers with concrete ensure a firmer foundation in loose or sandy soil. Both methods, if done correctly, will provide stability. - Ensure a Level Base:
Before installing the posts or spikes, make sure the ground around your air conditioner unit is level. An uneven surface can lead to misalignment or leaning of the fence. Use a level to check the alignment and adjust as needed. - Reinforce for Windy Areas:
In areas prone to strong winds, consider adding additional reinforcements. You can install horizontal bracing between the posts or use metal supports to anchor the fence further. These extra steps will enhance the fence’s resistance to high winds. - Regular Inspections and Maintenance:
Even after installation, it’s essential to periodically inspect the fence for any signs of shifting or instability. Tighten loose screws and posts and replace any damaged sections to maintain stability.

Q2: What type of wood is best for building an air conditioner fence?
A2: The type of wood you choose for your DIY air conditioner fence is crucial for ensuring long-lasting durability and resistance to outdoor elements. There are two main types of wood commonly used for outdoor fences:
- Pressure-Treated Wood:
Pressure-treated wood is highly recommended for building outdoor fences, including air conditioner fences. This wood is treated with preservatives to resist moisture, decay, and insect damage. It’s particularly useful for fences exposed to the elements and harsh weather conditions. Pressure-treated wood has a long lifespan and requires minimal maintenance compared to other wood types. - Unfinished Wood:
Unfinished wood can be used for your fence, but it is more susceptible to damage from moisture and insects. Without proper treatment, unfinished wood may deteriorate quickly, requiring more frequent maintenance, such as staining or sealing. While unfinished wood can provide a rustic look, it may not be as durable as pressure-treated wood in the long term. - Wood Maintenance:
If you opt for unfinished wood, you’ll need to regularly apply protective treatments like exterior wood stain or sealant to prolong its life. These treatments will help protect the wood from water damage and UV rays, keeping the fence looking great and functional for a longer period.

Q3: Can I add storage space to my DIY air conditioner fence?
A3: Yes, you can definitely add storage space to your DIY air conditioner fence design. Integrating hidden storage into the fence is an excellent way to maximize your outdoor space and keep your yard organized. Here are a few ideas for adding storage:
- Design with Built-in Storage Compartments:
One of the most common ways to add storage is to design the lower portion of the fence with built-in shelves or cabinets. These compartments can be used for storing tools, garden equipment, or cleaning supplies. Just make sure that the storage does not obstruct airflow to the air conditioner unit. - Keep Ventilation in Mind:
When designing a fence with added storage, ensure that there is enough space for proper ventilation around the air conditioner unit. The unit needs adequate airflow to operate efficiently, so avoid blocking air vents or placing large storage containers too close to the AC. - Access for Maintenance:
Another important consideration when adding storage is access to the air conditioner. You’ll need to leave space for easy access to the unit for regular maintenance and repairs. Consider building the storage in such a way that you can easily open the compartments or remove them when necessary. - Storage Design Ideas:
- Lattice Storage: Use lattice panels as the back portion of your fence and add storage bins or baskets underneath.
- Door Panels: You can design your fence with hinged doors that open to reveal hidden storage behind them.
Final Thoughts
These FAQs address some of the most common concerns when building a DIY air conditioner fence. By following these guidelines and answering key questions about stability, wood selection, and storage options, you’ll be able to create a functional, durable, and aesthetically pleasing fence for your air conditioner unit. Properly selecting materials and installation methods will ensure that your fence serves its purpose for years to come, protecting your AC unit while adding value to your outdoor space.
Conclusion
In conclusion, building a DIY air conditioner fence is a practical and creative way to enhance the aesthetics of your outdoor space while protecting your AC unit. By carefully selecting the right materials, tools, and design elements, you can create a sturdy and functional fence that not only conceals your air conditioner but also integrates additional features like hidden storage. Whether you’re opting for pressure-treated wood for durability or customizing your fence to match your yard’s style, this project offers both functionality and style. With the step-by-step guide and helpful tips provided, you’re now equipped to tackle the installation with confidence and create a fence that will stand the test of time.